Audience Interaction With A Social Media Page

Screencastify Of Analysis

To get a better understanding of social media pages, we spent some time analyzing other music artists social media pages. We analyzed Tom Walkers Instagram page as he is the artist who sang the song used in our music video. We then created a screencastify of his Instagram page as a group and we spoke about the key conventions that are present. When creating our own social media page this will help us as we are now aware of the conventions we need to include and the effect that this has on an audience.

Digipak Draft 3

Digipak Draft 3 Panes

Once we had received our feedback and made our final improvements to our Digipak, we completed all four of the panes. These are embedded below…

Final Draft in CD case

We printed out our Digipak panes in the correct order and put them into a real CD case to finish our project. This brought our product to life and it was useful to see what it would look like as a real album.

Peer Feedback

Lastly, we were given the opportunity to receive feedback from our peers on what genre they thought our Digipak was. They completed a tally sheet and ticked which genre they thought it was just based on looking at our Digipak in the CD.

Contact sheet

Digipak Shoot Contact Sheet

Once we had completed both our photoshoots, we then presented the photos on contact sheets. This helped us to compare them. We managed to narrow the photos down to the best ones and the ones we want to use in our digipak.

Chosen Photos

Front Cover

This was one of the best photo we took for the front cover. Taken from a slight high angle this gives the artist a sense of vulnerability due to the camera looking down on him. The photo is well lit and also displays a good amount of the MES.

Back Cover

This was the best photo we took for the back cover, this is because its in focus, bright and clear. You can see the detail in his eye due to the extreme close-up shot. The framing is great and his eye is equally balanced in the center of the photo.

Digipak Draft 2

Draft 2

Once receiving feedback on our first Digipak draft, we spent some time reflecting and making improvements to our front and back covers. In this time, we also started to create our two inside pages.

Front Cover

Inside page

Inside page

Back cover

Major changes were made to the back cover, we did this by taking the image of his eye back into photoshop and putting the colour back into his eye give it the pop of colour we were missing as the brown/orange tones in his eye work well with our overall colour scheme. We also adjusted some issues with arrangement on our Digipak by putting the two spines in the correct places. Lastly, we changed the font on the front cover to match with the font on the back cover. This gives our digipak a sense of branding, as well as making it appear much more professional.

Teacher Feedback

The feedback we received in order to help us make these improvements was given to us by our teacher using Screencastify. The screencastify is embedded below.

Targets for improvement

  • For our final draft, we plan to take the image of our star on the front page back into Photoshop and cut him out in more detail, making the cut out of his hair look more smooth and natural. Although we gave this a good go the first time we will need to develop this skill further to perfect our front cover.
  • Lastly, we want to add a wider variety of textures on the front cover. We have taken a mix of textured pictures which work with our genre and colour theme so we are aiming to include more of these.

Digipack Draft 1

Front cover

Back cover

Self Assessment

Overall I am very happy with these especially considering that they are only our first draft, as I think they work well. These have musch in common to our original idea which lets us know that we have succeeded in sticking with our plan. To get this outcome we used Adobe Colour Wheel to choose specific colours for the front cover and the warm, autumn colours we also chose to create a sense of branding for our Digipak. This is because they will also be used on the two inside pages. We chose to convert the image of our star image to black and white as we are trying to portray him as being ‘lost with no direction’. This creates a link between the album name and the title of his new song being released.  We used the front for the star’s name ‘Hendry’ which appears quite formal and almost creates a rustic feel, against the colours of the album, meanwhile the font on the back cover is less formal.

Targets for improvement

  • We need to work on the arrangement of our text and graphics, this is because some of these objects are out of line, causing our Digipak to appear messy. It is important we have a balanced ratio of space to text/graphics.
  • Our two inside pages need to be created and we need to ensure that they are up to the same standard as the front and back covers, as well as conforming with our brand.
  • Lastly, I think it would be beneficial to add another feature to the front cover. Although I like to look of it, it could be seen as being quite plain and we would benefit from having something to excite our audience into buying his album.

Evaluation of shoot or graphic design

Evaluation

We carried out two photo shoots. One  of these being for the front and back panes of our album, and the other for the two inside panes. We successfully completed the first photo shoot in the white studio. We took extreme close up’s of our star’s eye and mid shots of his face and body which we previously planned.

Our second photo shoot we went outside to find a selection of autumn leaves to use. We collected these and arranged them in ways we felt complimented the colours the most. Lastly, we chose a variety of autumnal coloured paints and flicked the paints onto a piece of card. We captured these photos on a high quality iPhone, making sure to take a variety of photos to choose from.

What Went Well

  • We planned our photo shoot well, as well as being organised when it came to getting the pictures we wanted. Our detailed plan enabled us to carry out both shoots quickly and smoothly, meanwhile getting all the pictures we wanted.
  • We captured a wide variety of colours and textures which is what we were aiming for. These colours and textures give our digipak depth and a raw, natural feel to it.
  • We have successfully created a sense of branding and have clear themes running throughout. This was because of careful planning, focus on the shoot days and team work.

What Could Have Gone Better

  • We could have spent more time on our first shoot taking a wider variety of pictures of our Star. Although we captured one that worked, it would have helped us to have photos taken from a wider variety of shots and angles giving us more to chose from.
  • We could also have taken more photos of textures and patterns to add to the front cover of our digipak. The textures we took work really well and it would be even better if we had taken some more and come up with some alternative ideas,

Photoshoot / Design Production Meeting and Risk Assessment

Production Meeting Agenda

Before doing the photo shoot for our digipak, we planed what exactly we were going to take pictures of. We completed a meeting in which we planned what our artist was going to wear, what shots we were going to take, the angles and lighting and who is responsible for bringing certain props and equipment. The outcome of our meeting is presented in a table below…

Risk Assessment

We then completed a risk assessment as a group. This outlined any potential hazards whilst we were shooting- weather it was the shoot in school or the shoot out of school. The risk assessment…


Overall aims

  • Our aim is to capture photos of the artist for the front and back covers of our digipak
  • During the second shoot, our aim is to capture photos for the two inside covers. These will not be photos of our artist, but photos/designs of autumn leaves and paint splashes which we will be doing in our own time.
  • We are going to ensure our artists outfit is correct and worn properly in order to show off our MES
  • It is important that we stick to our theme of autumn/warm colours to enable a sense of branding for our digipak
  • Lastly, we are going to make sure we capture a wide variety of shots so we have lots of ideas to choose from when it comes to editing the digipak. We are also going to give our artist a variety of poses and props to play with to ensure we achieve the best final photo possible.

DP mockup

DP Design Mockup

Once we had researched and looked into our ideas for our look book, we then had all the inspiration we needed to create our digipak mockup design. We drew designs for the front and back and two inside pages as a quick sketch. This is shown below…

Final reflection on our digipak plan

We plan to take photos of our artist (Alex Hendry) to use on the front and the back covers. We plan to have a photo of Hendry looking forward with his head slightly tilted downwards on the front cover, as well as a closeup of his eye for us to use on the back cover. We plan to have a red strip of paint covering his eyes to go with our autumn colored theme and designs and textures of warm colors in the background. Sticking to this theme will give our artist a sense of branding. For our inside pages we are sticking to this theme by having one page covered in autumn leaves and the other covered in paint splats using similar colors. All of the pictures and designs will be created and made by us working as a team.

Digipak Conventions Analysis

Album Cover Analysis

In order to help us design our own digipak, we took some time to individually analyze an album cover by an artist in the same music genre as us. I chose to analyze an album cover by ‘Sub Focus & Wilkinson’. I spent time thinking about the overall design of the album, the colors used, the fonts used and how everything has been positioned on the page. I analyzed in depth what the different features, convey, what the purpose and message was behind each aspect. My analysis slideshow is embedded below

Reflection

In conclusion, this task has helped me to understand the conventions of an album cover and this will help when designing my own. I now have an understanding of how different genres can be presented through an artists album and how features such as colors and fonts can do this effectively. It has given me inspiration for how I can create my album cover up to this standard and with just as much understanding.

The Look Book – the package

Look Book

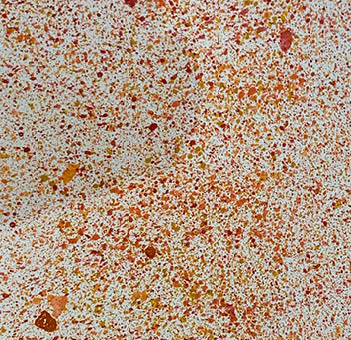
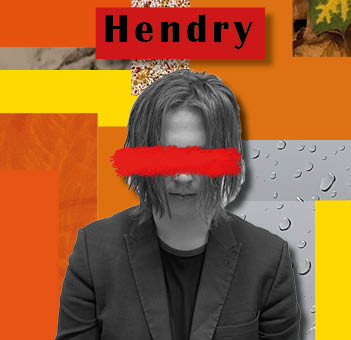
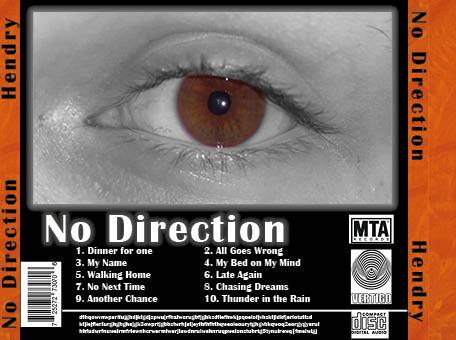
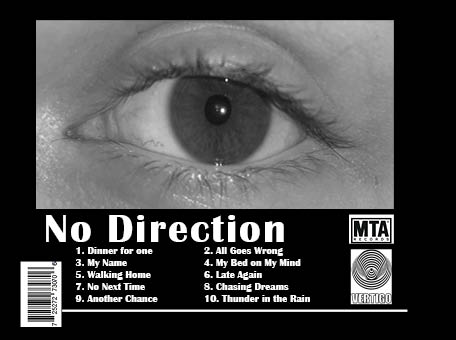
When creating or own Digipak, as a group, we created a look book using Padlet to help us get inspiration. To do this we looked at a variety of artists that were in the same music genre as us, we then took screenshots of the color pallets and patterns that were used. We also looked that social media pages and album covers that were also helpful for us to research. We noticed a connection between all of the artists work and displayed this on the Padlet below.

Made with Padlet

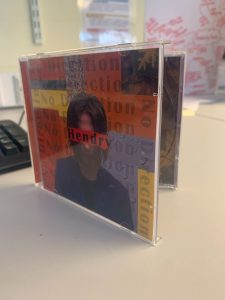
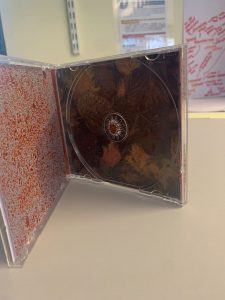
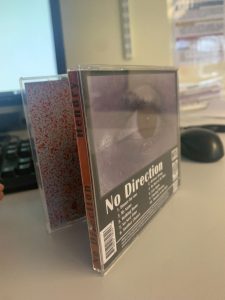
In conclusion, this particular task was very helpful as it has helped us to plan our own digipak. It has given us the chance to create our own designs. It has also given us an idea of what competition we are up against within the music industry of this genre. We noticed patterns of bright, bold colors to advertise the artist as well as their album. There are also patterns of this on their social media pages which help advertise themselves to their audience members. We need to keep all of this information in mind when designing and creating our own digipak and social media page, we also looked at how to make it unique to ourselves, to do this we were looking at ideas that has more of a warm tone color pallet .