Music Video Final Draft

Final Draft

Reflection

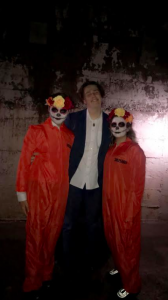
As a group, I think we worked well together to create a great end product. Our final video coincides with what we had originally planned for it to look like. We spent time and money working on our MES and I think we pulled it off well. The bright colours of the costumes contrast nicely against the dark locations we decided to use. We each practiced applying the ‘Day Of The Dead’ makeup to our modals multiple times to perfect the look and to work out which one of us applied it the most efficiently. Our narrative and performance portrays our song choice well and I think the purpose of our video is communicated well to our audience. We encountered some problems during the filming process of our video and we ended up having to do multiple shots in two different locations- The Underground Hospital and Grande Rocque Castel. It cost us £10 an hour to film in the UGH so we had to take this into consideration as a group.

We worked together to edit the video and we learnt many new skills during the process. We included a variety of transitions such as flashbacks and zoom-ins, and we spent time trying to perfect the colour correction technique that was used. The editing process was a challenge as none of us were familiar with the software Premiere Pro. However, by working together we achieved the things we wanted to.

If we were to do this project again, I think we would have planned our timings better – in terms of the days we filmed on. This is because we ended up having to film on three different occasions which was unfair on our star image and was extremely time consuming. We should have ensured all of our equipment was working before we left for shooting and we should have made a clear plan between us all as to specific shots we were going to film.

Music Video Draft 3

Draft 3 of our Music Video

In order to improve our music video, we asked for some feedback from our peers. We created a second draft and asked them what they thought went well and what we need to improve on. After receiving this feedback, we created a third draft which is imbedded below as well as a list of feedback.

Peer Feedback

Targets for improvement

  • We need to ensure our lip syncing is as accurate as possible by adjusting a few clips
  • Colour correction could really bring out the contrasting colours in our video so we need to give this technique a go
  • Using a variety of shots would also benefit our video so this is something we need to incorporate
  • Lastly, we need to ensure all of our flashbacks are introduced correctly so that the narrative makes sense

What has changed

  • We have included more ‘zoom-ins’ on some of the longer shots
  • On our flashbacks, we have added more ‘black-in’s’ to make sure our audience know that these clips are flashbacks
  • We have arranged clips that were out of time, to be in time with the lip syncing
  • Lastly, we completed another shoot at Grande Rocques Castle to ensure we have a variety of shots

Teacher Feedback- Screencastify

Screencastify Of Teacher Feedback

In order to help us edit the rest of our music video, our teacher viewed our second draft of the video and created a screencastify containing feedback and tips for improvement. Unfortunately, the Wi-Fi wasn’t working so a screencastify couldn’t be created. However, we received a video recording of feedback with specific timecodes in so we could work out which part of our video was being spoken about.

In conclusion, our narrative was understood well and was noted as a positive of our video. Our introduction is also good and our use of jump cuts were noticed. During the chorus, the pace of the music picks up and we edited to the beat well. We created a fast montage of clips which works efficiently. However, we need ensure that the rest of our fast paced montages are up to this standard and cover the fast music towards the end of the video. In addition to this, some of the lip syncing is slightly out of time towards the end of the video and this needs to be adjusted. Lastly, we need to spend some time thinking about the sequencing of our video. For example, we have a clip of our star walking down the corridor in full makeup and costume but then it jumps back to him being tied up in the chair with no makeup on.

Targets for development

  • We need to plug headphones in, play our video and work out specifically when the individual beat drops are within our audio and edit our clips accordingly. This also needs to be done with some parts of the lip syncing to ensure it is as accurate as possible.
  • We need to make a decision as to weather or not we are going to rearrange our sequencing to be in chronological order or if we are going to edit certain clips to appear as flashbacks. This will help the logical progression of our narrative.
  • Colour correction is also something that we are going to look into. We are going to try this out to enhance our dark, grungy background and if we like the results, we will commit to changing every clip in our video to this.

Music Video Draft 2

Draft 2 of Music Video

After trying to edit our first music video draft, we realised that we didn’t have anywhere near enough footage and that the quality of our filming wasn’t the best that it could be. As a result of this, we set a new filming day and filmed everything all over again using a good quality iPhone and this worked very well. Draft 2 of our music video is embedded below…

What Went Well

  • The MES and colours in our music video stand out greatly against our dark background and this is something that was important to us. We have yet to play with colour alteration, however, I think the colours work well without this being done.
  • During the editing process, we spent time trying to edit to the beat of our song. As our song starts slow and picks up pace during the chorus, it was important that we edited accordingly and I think we did this well. Our footage picks up pace and gets more exciting as the pace of the music increases.
  • Lastly, I think we have incooporated a good balance of narrative to performance throughout the video and we stuck to our plan of having the video portray the lyrics.

Targets For Development

  • In order to ensure our music video runs smoothly, we need to work on transitions between different clips and scenes. We need to be careful not to add too many of these transitions, but just enough to aid the flow of the video. Transitions will also give the effect of our narrative moving through time to help our audience understand our story better. We will mix transitions with flashbacks to create the atmosphere of some scenes being in the past and some scenes being in the present.
  • We also need to work on the continuity of our video as different clips show different stages of our performer’s makeup and then suddenly flashes back to him with no makeup on. We need to decide if we want to change this and arrange the clips in order or if we want to introduce flashbacks into our video and edit them accordingly. This could be done by introducing filters and colour alteration to create this effect.
  • The end of our music video needs some improvements done to it as we unfortunately ran out of footage and had to film in another location. We need to emphasise the start of a new beginning and a new scene for our star image.

Specsavers Feedback

Feedback from Specsavers

During the editing process of our music video, we were lucky enough to have the opportunity of having some ‘editing experts’ from Specsavers come in to view our incomplete music video and give us some feedback. It was extremely useful to have this opportunity as we were able to receive tips and ask any questions we needed to ask. We made note of all of the tips and ideas we received from the guys at Specsavers…

  • He stressed the importance of editing to the beat as our song has a fast paced chorus and he gave us easy techniques of how we can do this. He suggested spreading out our clips, putting on headphones and pressing the space bar when the beat hits.
  • We asked him questions about the continuity of our video and how we can fade in and fade out of flashbacks and try out colour alteration to enhance the effect of flashbacks. We are going to try out colour alteration throughout the video to enhance the contrast of colours we have used in both our characters and background. In addition to this, we have made a decision to add transitions and different types of colour alteration to create flashbacks within our narrative. This will not only add a more interesting storyline to our video, but it will help our audience to understand the transition through time and what has happened in the past, against what is happening in the present.
  • As we had to film extra clips at a new, outside location, he suggested using this as an opportunity to slightly change our storyline at the end of the video. We are going to use these clips as a sign of him breaking free, out of the chair he has been stuck in for the majority of the video.
  • Lastly, to help with our organisation skills, he suggested ordering and organising our clips so that we can plan and prepare what parts of our video go where.

It was also brought to our attention that most of the skills we could want to use, can be found on YouTube as tutorials made by other people. We will take this feedback on board and take time to plan and learn the new skills and editing techniques we want to use to improve our music video.

Music Video Draft 1- Rough Cut

Embedded Video- 1 min of lip synced performance

Self Assessment

In conclusion, our first music video draft is very brief and rough. We tried to focus on the performance aspect in our first shoot which limited our video as the performance is often tied in with the narrative. However, what we did manage to film was of good quality. Everything was in focus and filmed from the correct angles. The lip-syncing was in time and was very real and professional looking. Our star images body language and emotions are expressed well in this draft. However, we need to work on our editing process more to really ensure the video is at its full potential. This includes colour alteration, transitions, zoom in’s, zoom out’s, slow-mo’s and more.

Targets for improvement

  • We need to work on our transitions and editing between the different video clips. This will ensure our video runs much smoother and links nicely together.
  • In addition to the editing process, we also need to improve our filming skills in some areas- filming from a variety of angles and using a variety of shots. This will give us lots of different types of footage to play with and work on.

Shoot 2 Reflection

Reflection of Shoot 2

Our second shoot day was focused on filming our narrative. However, we ran into a few issues on the day of the shoot and we had to rearrange some things. Our original star image- Naffy as not available on this day as we had originally thought. This led to us recasting our star image as Hendry! He quickly learnt the words to our song and had a clear understanding of our the narrative as he was also present on the day of our first shoot. In addition to this, our second kidnapper ( Jess ) was also not able to attend the second shoot so Annabelle stepped in as her replacement.

Although this was not what we had originally planned, it well benefit us in the long-run as Annabelle and Hendry are available more often than our previous two cast members. This makes it easier for us to plan re-shoots and group meetings.

(Robert and Annabelle- The Kidnappers in full costume and makeup)

( Our new star star image, Hendry, with the kidnappers)

Conclusion

In conclusion, our second shoot ran much smoother than our first shoot. As our narrative is closely linked with our performance, it was much easier to film scenes with all 3 of our actors together. We also discovered that Hendry is much more confident at lip-syncing and acting than Naffy was, as he is currently a drama student. This has helped us to convey our storyline much better as Hendry shows clear emotions when he is on camera.

Although the problems we ran into have set us back slightly, we now feel much more confident in our actors and within ourselves when it comes to filming them. Our knowledge of using the camera, tripod and lights has improved and we are becoming quicker at applying the makeup to our actors.

Targets

  • It is essential we are in agreement with our actors about when we are meeting and who needs to be there for every shoot. This will help us to avoid previous problems we have run into.
  • We also need to check all of the equipment before we leave school for our shoots as our camera ran out of charge halfway through shoot 2.

Narrative Development

Narrative Sheet

As we have filmed the performance side to our music video, we now need to film the narrative side and this required a lot of preparation and planning. Firstly, we filled out a sheet below with all the information regarding the narrative. This included the type of narrative we are filming and the structure to it- Disruption, Resolution and the New Equipmentilibrium. We also discussed the key themes for our narrative and gave a brief outline of the storyline.

Reflection

It was beneficial for our group to complete this sheet as it gave us the opportunity to think and plan our narrative more in depth. We have discussed the key themes and ideas for the narrative side of our music video and also made note of the MES that is being used. It also gave us the opportunity to start thinking about the theory side of our narrative- Todorov’s Theory. This is the theory that every story ( or music video ) starts with an Equalibrium, has a Climax, Event and finishes with the Problem Solved and Restoration. This is very similar to the structure of our own music video narrative.

Our music video is also following an amplified narrative. Our storyline links with the lyrics of the song but it does not demonstarte them word for word. We have put our own spin on the narrative as opposed to an illustrative or disjunctive narrative.

Video Narrative Story/ Shot Sheets

Shot Sheets

In order for us to be properly prepared for our narrative shoot, we thought about the specific shots we wanted to shoot. We split the narrative up into 4 scenes and created detailed shot sheets embedded below. This includes specific shots and descriptions of angles, movement and framing.

Reflection

It has been helpful for us to complete these sheets and create shot sheets as we now have a detailed plan of what we want to achieve on the day. It has ensured we understand what we want to portay with our narrative as well as ensuring we have coverage, a variety of shots and enough footage to be able to convey the narrative.

Creating our shot sheets has also linked with our narrative theory we have recently been discussing- Todorov’s Theory. This is the theory that every story ( or music video narrative) has an Equilibrium, Distruption, Resolution and finishes with a New Equilibrium. In our shot sheets, we have displayed this through 4 different key scenes in our narrative.

Risk Assessment

Narrative Shoot- Risk Assessment

As we have filmed our performance shoot, we now need to film our narrative shoot. We are filming in the same location as last time but it was still important for us to fill out a risk assessment sheet. As we are filming in school time and this is a school project, we had to carefully think about every hazard and how to avoid them. Our risk assessment is embedded below. I was also useful for us to have a record of who needs to be there and where/when.