“Prelim Task Lip Syncing Exercise”

Lip Syncing is when someone sings the lyrics in sync with a pre-recorded soundtrack. Lip syncing is used in most music videos to ensure that the audio stays as high quality as possible. It also enables you to compose a video from lots of  different takes, allowing lots of different angles and distances. It is important to make sure that lip syncing is not over enunciated as it could become difficult to edit and takes away from the realism. You must also ensure that your star matches the artist as if they don’t fit the stars image, then the grain of voice may be perceived in a different way. This could effect the realism of the lip syncing; even if it is edited in time with the music.

Using the footage taken at the green screen studio, I then edited the clips together to form part of the song “Poker Face” by Lady Gaga. This was great practice on how to lip sync and edit in time with the music. I also played around with some effects. As well as learning how to edit a music video, it also taught me and improved my skills with using the software “Adobe Premier Pro”. For example, I have learnt how the markers can help and how you can see and use the sound waves when syncing up the film and audio.

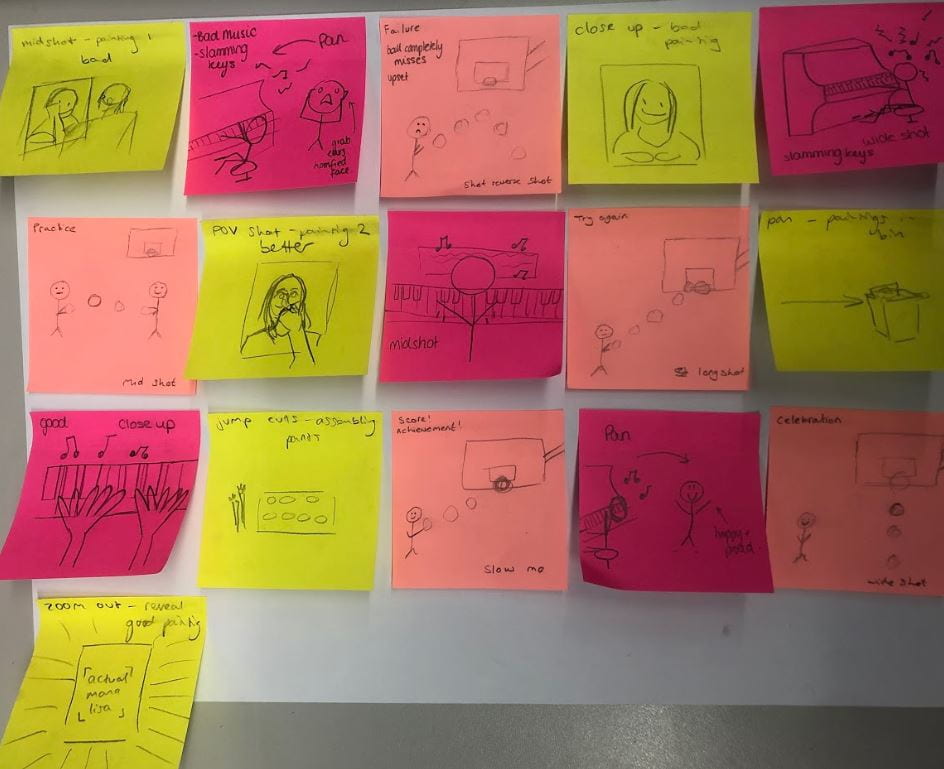
Below is the section of music video which I have edited.

I was pleased with how this piece of music video turned out as:

  • I was able to successfully edit the filming in sync with the audio so that the lip syncing is in  time.
  • I was able to add energy through the cutting speed which followed the pop genre of music.
  • I was able to compose the clips so that there are lots of different angles and distances.

The parts that were less successful and what I have learnt from them:

  • Making sure that their is some continuity with who is singing. (We just played around with who was singing but in my actual music video, I will need to make sure that my chosen star matches the style of singer in the audio and they stay the same throughout.)
  • Some of the transition effects are a bit cheesy and don’t really work. (Again I was just playing around with the editing software but in my actual music video, I will need to consider the effects a bit more.)
  • The pieces of film do not have too much movement so I must ensure that when filming my actual music video, I take lots of different types of shots.
  • We didn’t consider Mise en Scene in this task but this will definitely need to be used when creating our music videos.

“Prelim Task Mood Montage”

In preparation to making my music video, it is essential that I have learnt how to edit and use a camera for filming. This task looked at montages and how to edit pieces of film together to portray a narrative. We decided on the theme of “practice makes perfect”, showing the stages of developing skills. We decided to show how an artist can improve their painting skills, a musician can learn a piece of music and a sports player can score a goal. Below is a story board of how the montage will be assembled.

Each colour of post it note represents each narrative. The stages are in chronological order and show what will be filmed and annotated with what we want to show (for example, the facial expressions), the type of camera technique we will use and how we will edit the piece of film.

Below is the finished montage, “Practice makes perfect”.

This montage creates an impact in that it presents the idea that if you work hard at something, you will eventually become successful. The fact that the individual stories do not become perfect straight away shows that becoming good at something doesn’t happen overnight and that perseverance is key.

Our narrative of “practice makes perfect” is presented through three hobbies; art (painting), music (playing piano) and sport (basketball). At the beginning, all three were pretty terrible but by the end, all three characters had achieved their goal. We tried to showed the importance of a positive attitude through the facial expressions and the fact that no one gave up. The music also helped to show this. We chose the song “don’t stop moving” as it is a very positive and motivational piece of music.

One way that editing helped convey the narrative was the reaction shots. After the shot of playing the piano at the beginning, we then cut to a shot of Casey’s face. This showed the idea that he was not most impressed. However at the end, we used another reaction shot where Casey was very pleased and smiling. The contrast between these two repeating reaction shots helped to convey the theme of practice.

Another editing technique that helped to convey the message was that we used a slow motion shot when the basketball finally entered the hoop. This emphasized the success and also added to the tension on the approach to the hoop. This enabled the moment to last longer making it special and worth the work.

We also used jump cuts when editing the clips. This was used when paint was being added to the palette. This enabled us to show the different paint being added without wasting too much time. This added to the montage in that it showed the progression of time without taking too long and boring the audience. This adds to the theme in that practice also doesn’t happen quickly.

Although we were able to successfully create a montage that conveys the narrative “practice makes perfect”, there are some improvements to be made. For example:

  • the transitions from one clip to the next is quite random and does not necessarily match the timing of the music. If this improvement was made, the montage may run even smoother and cleaner.
  • the transitions between clips are also different each time. Although this isn’t a huge problem, it doesn’t make the piece of film follow a specific continuing style.
  • the mise en scene for the basketball player is slightly off as he isn’t wearing sports clothes. This could effect the way in which the story is received from my audience.

If I was to redo this montage, I would want to take some establishing shots and have them at the beginning. This would set the scene of the stories, giving my audience even more information on what it is about. I may also use more jump cuts to show the progression of time.

From creating a montage, I have learnt many things that I can use when creating my music video:

  • It is important to take many different shots from lots of different angles. This will enable myself to use lots of different editing techniques, making it more interesting.
  • I need to think about exactly the narrative I am trying to convey and then use the right editing techniques (as well as mise en scene and camera techniques) to follow the theme.
  • I will need to plan out exactly how I want my music video to be so I know exactly what to film. This is important as if you just improvise, you may not be portraying the narrative correctly.