Overall Evaluation

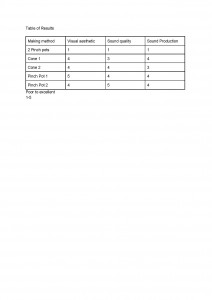
Once all the instruments were complete I decided to evaluate how well they played etc. As I am not a flute play I asked a friend to play the flutes and compare to a typical flute.

Here is a sound sample of the plastic flute:

Here is a sound sample of the copper flute:

From this, I learn that the plastic was easier to play as the embouchure hole was in the right place and the lip plate made it a lot easier to make a sound with. The finger holes were ok although it was rather hard to cover them.

Whereas with the copper flute the embouchure hole was in an awkward place, this made it hard to produce the sound where as the fingers holes were more comfortable on this flute.

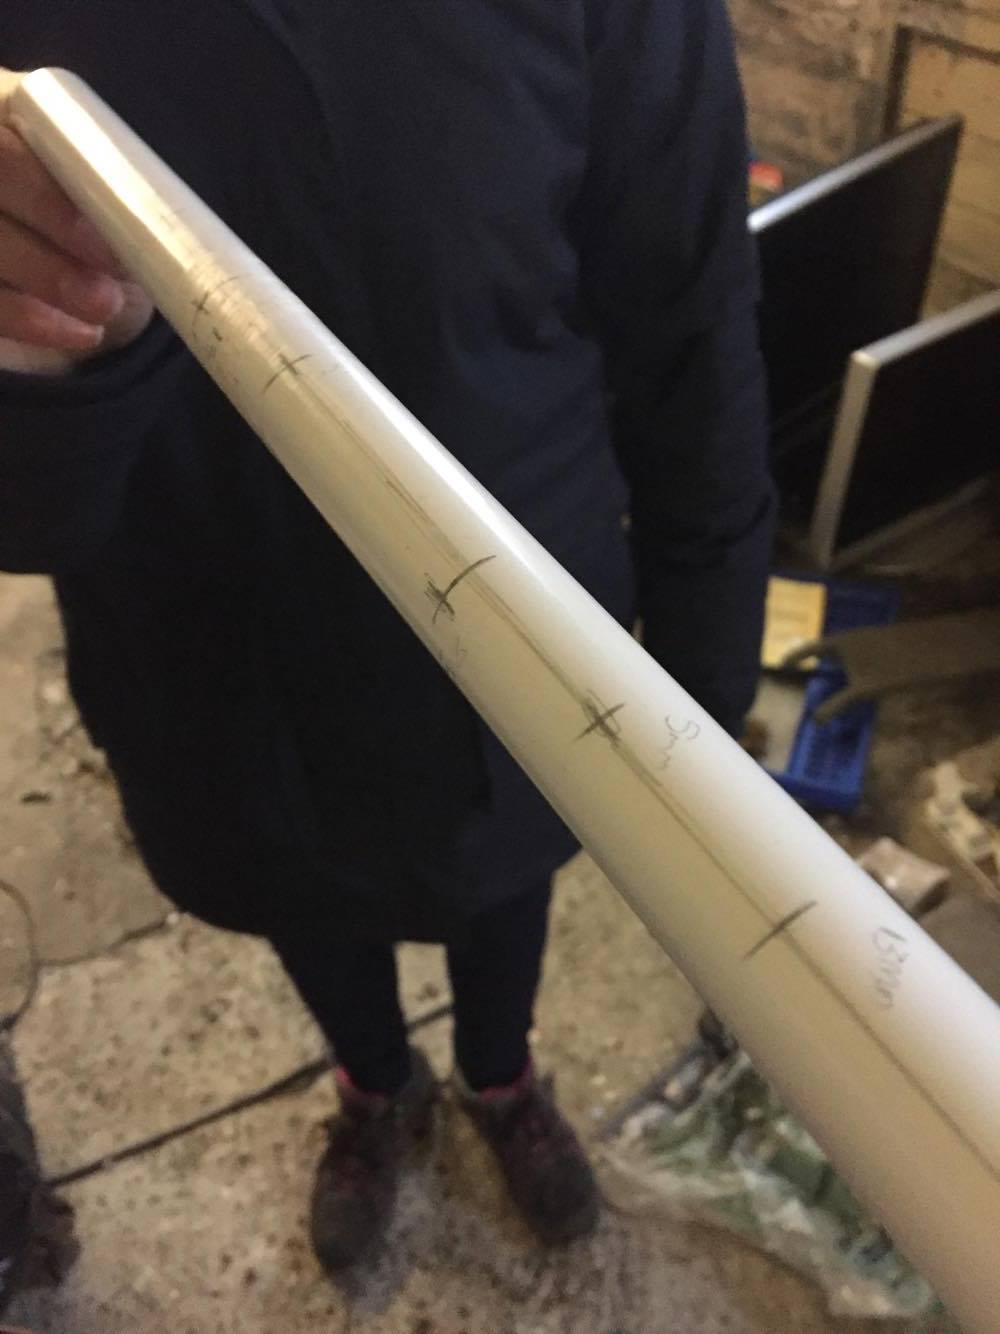
The tuning these two instruments weren’t my main concern as I wanted to learn how the instrument is made and how it produces sound, because of this I followed a method which told me the hole placement and sizes. Because of this, the instruments was able to produce several notes.

As I am able to play the saxophone I was able to play the experimental instrument.

Here is a sound sample:

Most of the finger positioning is comfortable it’s just the thumb hole which isn’t aligned with the rest. There were no also noticeable air leaks on this instrument so it was fairly easy to play. The main problem was that I wasn’t able to tune the whole instrument as the notes became unplayable past a certain point, I wasn’t able to find out why this happened but I think it could of related to the material used and the size of the tubing used.


Experiment Instrument

For my last instrument, I have decided to use the leftover PVC piping and add a mouthpiece of another instrument. This instrument creates sound by the reed vibrating against the mouthpiece. In order to create an airtight gap between the connector and the mouthpiece, I used hot glue gun. Once there was no air leaking I went outside to predrill the holes and then tune it. The main problem I had when doing this was the tuning. When I was outside it was rather cold so when I came inside the instrument changed tuning because of the heat change. This is why instruments are usually tuned inside at about 20’c so that they are usually in tune when being played indoors.

Another mistake when creating this was that I didn’t take as many photos as I wish to.

Above is the hot glue gun I used to create an air-tight seal around the connector. As well as the two mouthpieces which used to Make the sound out of the instrument.

Above is me drilling the tuning holes for the instrument.


Copper Flute

After I made my first flute I decided to create another but change the material I made it out of. I found some spare copper piping, I used the same resource to create this flute as I did with the other so had a good idea how it worked. This time I transferred the inches into mm beforehand in google so I had a better idea of what drill bits to use.

Unforutanly I didn’t take any photos of the making of this flute but here is an image of the finished product. I added a cork on the end to stop the sound going out the end to make it easier to produce the sound.

This flute turned out much easier to play all the hole sizes were coverable by fingers.

Making Flute

When creating the flute I used PVC plastic for the main body of the flute.

When cutting the pipe to the correct length, I measured with a tape measure then marked the pipe. In order to create a straight line that goes around the whole tube, I used a connector. As the connector is designed to connect two tubes together I had to remove an inner so it was able to slide onto the tube. I did this with a hole saw and assistance of someone that has greater knowledge of how to do such a task safely.

Once the inner ring was removed I sanded the inside to make the surface less rough and then slid it onto the pipe to draw the line at the cutting point.

I then cut the pipe to the correct length and sanded the edge down to reduce the likeliness of plastic splinters.

Once the piping was ready we drew a straight line across the pipe and used the resources to mark where the holes were mean to the placed.

After this we drilled the holes, unfortunately, we didn’t have a drill bit for the 12.5mm holes so we used a flat bit instead, this caused a few problems as it’s not designed to go throw rounded surfaces, if I was to do this again I would look at getting a drill bit for these holes. Finally, I added the connector to the embouchure hole and inserted the cork to the end of the instrument.

Once I made the first flute I decided to evaluate it before I make the next one.

The main problem when making the flute was the hole sizes and the fact that the method was written in inches and not cm. This caused a few mistakes and problems such as the holes being too big for my fingers.

A sound is produced from the instrument but it is hard to get a clear sound but does play a few tuned notes.

Flute Research

Once I realised I need to change my title I had to decide upon which instruments I was to look at now. The first one I decided was a flute, once I decided upon this I choose to look at how the instrument created the sound, what materials to try and make one out of and a method of making.

Firstly when looking at how the sound is created I simply did some research on the internet. From this, I found that the sound is created in a very similar way to the ocarina. There is an embouchure hole in which the player blows across the top, then the air gets split in two the air inside the flute vibrates to make the sound.

When I did some research I found out that the flute can be made from a few materials such as wood, metal and plastic. From this, I wanted to know if there was a sound difference between the plastic and the metal. So I planned on making one from both materials.

Unfortunately, I was only able to find one making method on the internet which seemed reliable and easy to follow. The other problem was that the measurements were in America measurements (inches) which make it harder follow and I will discuss more on the evaluation of the first instrument.

New Title

Due to a few problems like being unable to play the ocarinas, I didn’t want to waste the clay I would have used to find a solution to the problem. From this, I decided to change the title of my project along with the aims.

I changed to title to ‘A Collection of handmade Wind Instruments’.

From this, I will create a few different instruments preferably the wind find out how the sound is created for each that instrument and then have a go at creating them but also experimenting along with evaluating the instruments I make and looking areas of improvement.

My main aims are to:

  • Create at least 3 different wind instruments.
  • Research into how the sound is made.
  • Do some sort of testing/experimentation on each type of instrument.

Problems

I have so far run into a few problems when creating the ocarinas but I noticed that I haven’t looked at them and then worked out what I have learnt. So that is what I shall be doing in this post.

One of the problems is that when creating an ocarina out of clay the clay will harden and change slightly over time. This became a problem when I started playing one ( or trying to play) one of the ocarinas I had made for the test that seemed perfectly fine when making but became unplayable once hard. From this, I have learnt to keep an eye on all the ocarinas when hardening to check they are still playable.

Another from rather early on was that I didn’t have a time plan, I didn’t have any idea of when I wanted to do the test or what lessons I was going to make Ocarinas in. From this, I dedicated lessons to making the ocarinas for testing and another lesson for writing up my blog. From this, I have found it is much easier to keep on top of the plan that I had created for my EPQ.

The last problem is that I’m dealing with at the moment is that I am unable to create a sound from the ocarinas after they have been fired, to solve this I’ve looked at my resources and tried to get in contact with people that may be able to help but I’ve had no response.


Voice testing

Once all the instruments had dried I tested each of them in the same way. I did this to gain vaild test results. I also choose to write down numbers in different areas rather than just noting down opinions on each instrument to gain measurable results.

On the visual aesthetics of the instrument by this I mean whether the instrument has and obvious imperfects (cracks and dents). Sound production quality was testing how clear the sound was to hear for example it could have sounded too fuzzy. Lastly, in sound production, I tested how easy it was to make the sound from the instrument.
tableofresults-page-001

From these results and from production the Pinch pot method is the best method of making the instruments.

As practice towards the tuning of the instruments, I tuned some of the instruments. From this practice, I figured out the tuning system I hope to use and created a chart for tuning so that I can tune in any key.

Final Test

In this week I did the last test on method making, the pinch pot method.

In this test, I created the chamber by creating a pinch pot and then closing one end of it to a point. While doing this I smoothed the body of the instrument out to remove creases.

15216061_1106267652827790_2083631765_o

Then I created a mouthpiece which had a small slab of clay behind it, to strengthen the wall. With the body, I flatten one side to create a flat base and then another to add the mouthpiece. When attaching the mouthpiece I score both parts and slip to both parts to ensure they are blended well.

15216249_1106267699494452_801899168_o

Then just like the other two methods I make the voicing and airway in the exactly same way.

Test 2

This week I tested my 2nd method the cone method.

For this method, I firstly created a cone shape out of the clay. Then I created a hole in the cone, leaving room at the thinner end of the cone to use as the mouthpiece which I marked with a line. Then I gradually increased the size of the hole and evened the walls in the process, to close the gap up at the larger end of the cone I shaped a flat piece of clay to put over the gap added slip and scored the surface and then smoothed the piece in. This created the chamber of the instrument.

15216216_1106267956161093_702617164_o

Next, I created the voicing and airway for the instrument, for this, I used the place where I marked and made a small hole. Then a created the airway by inserting a spectacular through the mouthpiece which came out by the hole a created for the voicing.

15204228_1106267816161107_666621672_o

In this test, I used the knowledge I learnt from the last test and created 2 of the products.