Double Page Spread

Standard

 What is a double page spread?

Quite simply, an article that takes up 2 pages and includes copy and photographs. It is usually the ‘centre’ two pages of a magazine and will usually feature the main cover star from the front cover. In other words, it is THE BIG STORY.

In the New Year, we will be focusing on the copy, headlines, captions and how to write the main feature for the double page spread. Writing well and in the right register for your audience is a skill all media communicators need to master.

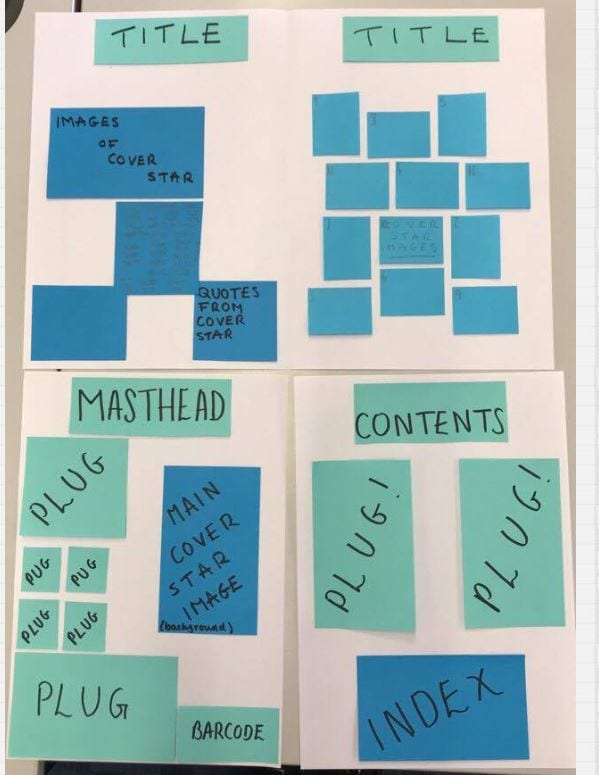
In the meantime, mocking up and drafting your double page spread should be done before Christmas.

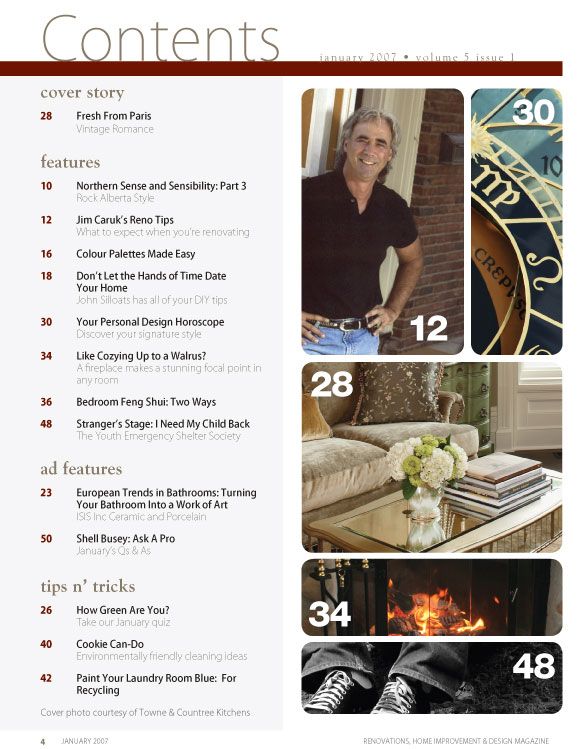
Here are some classic examples of music magazine double page spreads.


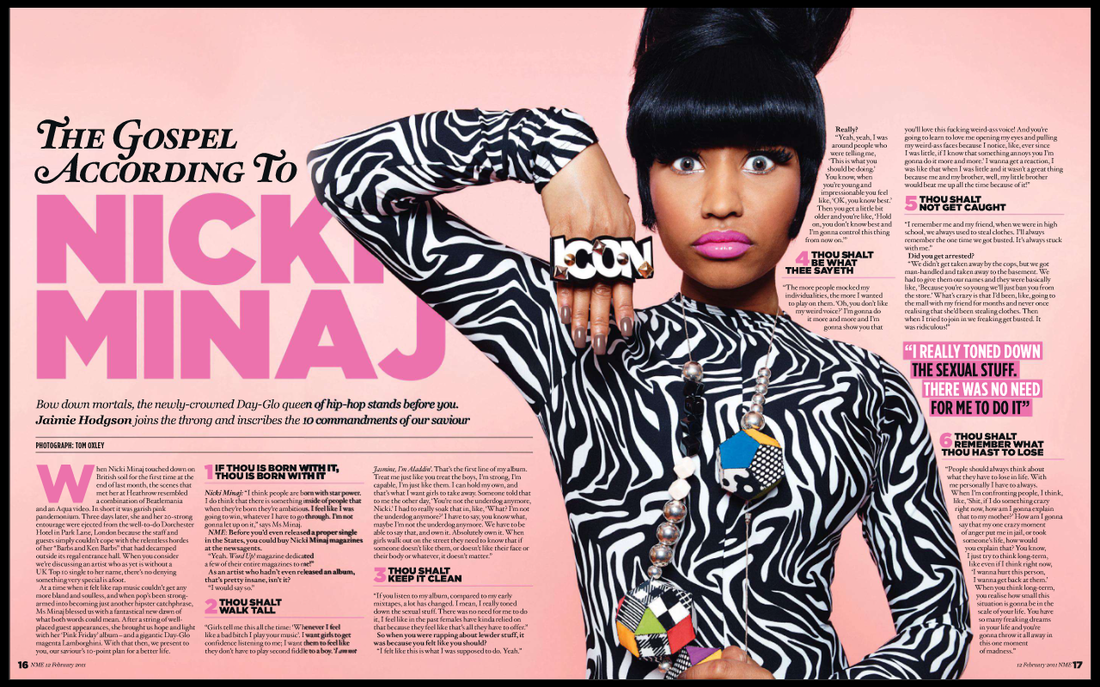
Here are some basic conventions, codes of how a double page spread usually appears.

  1. The image will go across the two pages or be on one with the writing on the other side.  Usually the photo goes on the left but not always.  The writing in a column will NEVER be split across the staple line!
  2. Stand first– this is an introduction to the article – it will sum up/precis what the article is all about and entice the reader to read on.
  3. Drop capital – it extends down 3 or 4 lines.  At the start of paragraphs the first letter is often much larger; makes reading easier and acts as navigation through the text.#
  4. Quotes – can be controversial and used to break up the copy/text or act as a headline and could use a larger, stand out font.
  5. Headline – sometimes a quote from the interview with the artist. Often uses alliteration so that the headline stands out.
  6. The By Line – says who the article is by.
  7. Direct address – the model will often break the 4th wall.
  8. Columns usually 2 or 4 with equal guttering (spacing horizontally between paragraphs and vertically between columns).
  9. Colour scheme – continues with the brand, vibe of the other pages i.e. cover colour scheme.
  10. Page numbers and a little version of masthead or logo somewhere on the page.
  11.  Instead of full stop at the end of the article they use a small block or something to do with their logo/masthead (for example on NME they might have an ‘n’).
  12. Appropriate language/register to establish a relationship with the target audience.
  13. They may have a release date for album or a tour date.
  14. On the photo they usually have somewhere by it the name of the photographer.
  15. Questions to the artist from the interview will be in a different colour, and the name of person who asked the question.

Feedback – Draft 1 Front Cover, Contents, Double Page spread

Standard

For all of your FIRST DRAFTS you will get some feedback from one other member of the class. Your teacher will split you into pairs.

FEEDBACK

  • Show them your draft and then make sure they give you approximately 5 comments – it can be advice on what to do to improve and/or what they like about it.
  • Record this conversation as bullet points.

TARGETS

  • Collate 5 targets that you will need to address for your next draft and bullet point them.

AREAS TO COVER IN YOUR CONVERSATION/FEEDBACK:

  • Use of image and manipulation (photoshopped well?)
  • Use of appropriate MES for the star image/genre.
  • Masthead design and positioning.
  • Colour palette for the genre.
  • Appropriate use of font.
  • Layout of font and images – integration (wrap around image etc).
  • Does it look/feel like a music magazine?

FURTHER FEEDBACK

  • You can also include feedback from Ben, our tame graphic designer, to give you some advice and you can say in your post that you got feedback from a professional.

Location shoot plan + photos of locations

Standard

This is the form that you should complete to book your shoot time and models.  Find your slot (in green) and then put your name by who you want to be your models in the same time frame as you slot is scheduled for.

Click on the photos to see a variety of ideas, shots, locations for the House Location and the Out and About Location at Perelle – 12A

Click on the Castle to see the Images of Locations around Castle Cornet 12B – Mr Gregson

Click on the Castle to see the Images of Locations around St Peter Port 12D – Miss Hales

Contents Page – Draft 1

Standard

Before we go out on our location shoot, you should have a mock-up, draft of the Contents Page.

You will have your ‘lick n stick’ to refer to but make sure you do some extra research to find out what is conventional for a Contents Page.

It is an INDEX, MENU for what appears in the rest of the magazine with page numbers for REGULAR AND SPECIAL FEATURES.

It will also contain some photos that relate to the featured articles.


  • Title:   The main text on the page will be the title saying ‘contents’ to indicate that this is what will be on the page.
  • Main image There will always be a main image on the page that stands out the most and will usually be much bigger than the others that feature the page.
  • Sub-headings Magazine contents pages will be set into different categories depending on what type of articles are inside the magazine. The sub-headings on the contents page are usually in a bolder font that grabs the person’s attention more. The biggest font usually for the headings will be 14pt.
  • Ordering and structure The articles are set in a chronological order so this makes it easier for the reader to find what they want to read. Also there will be a few words for a few articles within the magazine, this will then give the reader an insight on to what will be inside.
  • Colour scheme The colour scheme used on magazine contents pages will usually relate to the theme of the magazine. It will also be simple and not contain too many colours so that it is easy for the eye to read and they don’t distract the reader.
  • Layout and other contents : The contents page will sometimes include the title of the magazine,the issue date, a picture of the front cover, contact details and the credits for the front cover
  • Editorial: there is often a short piece from the Editor, celebrating and signposting the contents of that particular issue.

Image File Types

Standard

What you need to know about image file types:

This should not be an issue unless you keep saving your files as a Jpeg.

You should be doing all your photo manipulation in Photoshop and once it is complete placing the Photoshop file in Indesign. In other words, now that we are into the proper design stages, this is what you should be doing.

Masthead Designs – Indesign Tutorials – how to add fonts

Standard

Now you know what your magazine is going to be called (you should have decided this for your Mission Statement), you need to have some fun designing some mastheads.

  • Use the inspiration from the fonts you have included in your moodboard and design about 5 on one Indesign A4 template – make a note of the fonts, size that you use alongside it.
  • Focus on weight, size, height, boldness etc and add some effects from the FX button.
  • We can import fonts from dafont – but you need to create a DAFONT folder in your D Drive so that the IT technicians can then install them.
  • However, you can also take them into photoshop and manipulate them in there. However, this won’t be great for copy, captions as it will take too long but should be fine for the masthead.
  • Remember, bold and conventional font for the genre of the music and one that is also eye catching.
  • Choose one final design and include it on its own A4 template in Indesign and position and size it accordingly.


Because we are not allowed to install the fonts, make a folder in the D drive of any that you really want and download from dafont.  We will then get them all unlocked in one go when the IT technicans can come down.

In the meantime, make sure you play with Indesign..you can change the shape of letters, add block colour, change the kerning, add chevrons etc


Contact Sheet

Standard

How To:

Make sure ALL of your photos are in your project folder in the D Drive.

  1. Open Photoshop & Your Blog
  2. Go to File>Automate
  3. Select Contact II
  4. Choose the Folder where the images are
  5. Select how many rows and columns for you contact sheet 4×6 is OK, but depends on the number of photos.
  6. Export as a PDF & Jpeg and upload to your blog.
  7. Below the contact sheet – put the image(s) that you are going to use in your design

Magazine Page Layout

Standard

Rough Layout

Before you start working on your project in Indesign and Photoshop you need to have a rough idea of your page layouts.

Remember the assessment criteria:

  • Use of Conventional Layout
  • Integration of Images and Graphics

To achieve this you should have thought about how each element of your page will work together to create a coherent whole and to achieve AIDA:

  • Attention
  • Interest
  • Desire
  • Action

Task

Using examples of magazine pages made professionally to plan your layout.

  1. List all the elements on the page that are conventional (typically expected), you should do a list for each page, (help below):
  2. Using cut up postit notes for the different elements of your page design.
  3. Try a number of lick and stick layouts for each page until you have found a basic layout you are happy with.
  4. Take photos and upload them to your blog – use captions to identify the pages.
  5. Introduce and reflect on the purpose of the task and how it will help on your shoot and in DTP (Editing)

Front Page Design Elements

Double Page Spread Design Elements


Contents Page Design Elements

Here is a document to help you identity the elements of a contents page.

Production Meeting Agenda – PMA + Studio Booking sheet

Standard

In order to plan your studio shoot of your main cover star, you will need to be REALLY ORGANISED.

Use this Production Meeting Agenda to plan out exactly when and where you are doing the shoot. Who is responsible for bringing various props, MES and who will be doing hair and make-up.

You will need to think carefully about who your model is and plan with them when they are available for the shoot. Plan to have a free before so that you can get them ready and maximise time in the studio or use breaktime or lunchtime to get everything ready.

PRODUCTION MEETING AGENDA (make a copy)

The link to the Photography Studio booking chart is in the previous post. You will need to liaise with your model to ensure that you are all free and available.


Photography Studio Bookings

Standard

Photography Studio

You can each book one slot in the Photography Studio for your model shoot in the weeks beginning: 13/11/17 or 20/11/17. There are two studios available one white and one black.

You must negotiate with your other teachers or tutor to absent yourself from the beginning or end of their lesson if necessary.

Click here to book a slot in one of the studios.

Here are the current bookings of the two studios:

You can book 2 slots but they must be spread out over the two weeks.  Find a partner from the class to work with and back to back your shoot perhaps?