Performance Production Meeting Agenda

Standard

It is vital you are prepared, organised and ready to film your performance.

Remember to complete a Production Meeting Agenda and consider the following:

  • Carry out and complete risk assessments and get relevant permissions
  • Do your performer’s know their lines (have you printed them out in large print?)
  • Do you have your planning documents?
  • Do you have cameras, tripods, shoulder mounts, quick release shoes, batteries, SD cards (take at least 2 cameras and check they are charged etc)?
  • Do you have costumes, make up, accessories, shoes?
  • Do you have musical instruments?
  • Do you have microphones?
  • Do you have everyone’s contact numbers?
  • Do you have food and drink?
  • Will you set up in advance of your actors, performers arriving to cut down on hanging around time.

Genre analysis

Standard

TASK (this is collaborative so you can submit the same document but you all have to equally contribute).

Victoria Sponge! One way of remember what ‘genre’ is all about.

Create a Slideshow with a voice-over or a Voicethread focusing on the Repertoire of Elements necessary for your particular band /artist to be generically conventional.   You could also use Screencastify to record your voice over. You can then embed it in your blog. You could  also mention print design.  You can probably already use a lot of your ideas from your song pitch but be careful not to just copy this but instead use it as a foundation for exploring the genre of your song and how this will impact on the video, web pages and  digipak.

Some of the suggested areas of music videos to cover are on this sheet but you should consider:

  • Website of similar artists
  • Album art from similar artists
  • Videos of similar artists

Find generically similar artists.

  • Discuss who they are, what do they wear, how do they style themselves, where do they perform, who are their fans, how are their digipaks / videos similar, what common features are there in their music videos (fast paced editing, hand held camera, filters, locations, authentic/live performances, produced performances etc). Use your performer too in among the analysis.

Use this document to structure your slideshow

Ensure you get the following terms in to your presentation and also your introduction and reflect on the value of the task in the blog:  

  • Repertoire of elements
  • Conventions
  • Blueprint
  • Predictable pleasure
  • Contract
  • Label
  • Target audience

Consider ‘genre’ as you produce your video and it will be so much easier to talk about if it comes up in the exam in Section 1b. 

Here is an example from last year

Music Video – Performance Shot List

Standard

Instead of a written list of shots we want you to create a visual shotlist of the kind of shots you want to include in your performance shoot.  Now that you have filmed a very short performance sequence, you know how many shots you need just to get coverage.  This is a group effort so share a slideshare amongst you.

However, certain genres rely specifically on certain shots as part of the repertoire of elements.  For example heavy rock might be canted, hand held camera shots with whip pans a plenty. Indie acoustic might be much smoother, longer, pull focus shots.

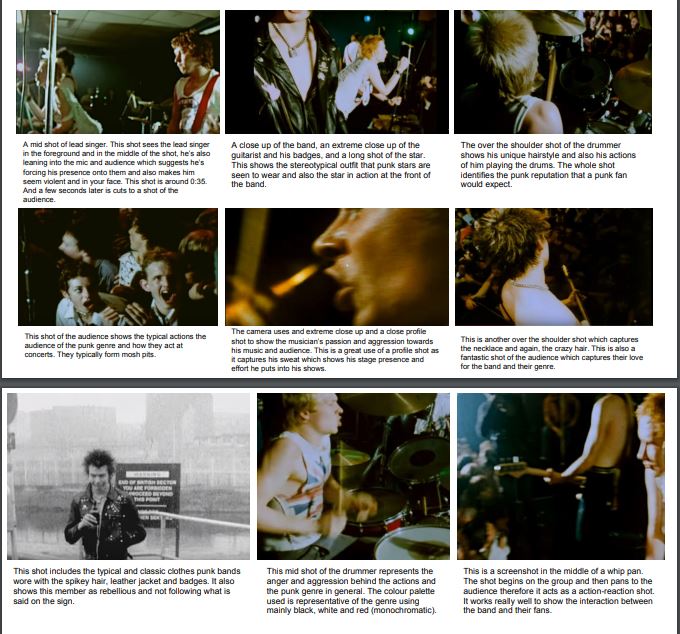
You should study other bands of a similar genre and collate @ 10 screen shots of conventional shots, frames, angles they use in their performances. You should look at at least 3 – 4 other music videos and use shots from these. You will then title the shots with an explanation of the shot i.e. close up of guitarist’s instrumental mastery; whip pans between band members looking at each other; master long shot of band performing as a unit; mid shot pan of band members; extreme close up of lead singer’s expressive face and vocals etc. Always add in some textual analysis….how does that shot help represent, connote, convey, portray the star?  YOU NEED 9 DIFFERENT TYPES OF SHOT; distance, angle, framing, movement, special.

Clearly a lot of the energy and dynamics will come from the edit in post-production but you will need a variety of shots of the performer from different angles with different movement to give yourself adequate footage.

Remember:  take at least 2 cameras for your performance shoot and get the band to sing the song several times through and take complete footage of the song being performed from different angles, distances and with different movement.

Also think about shots where movement happens through the frame…i.e. feet or people walking across the screen? What about POVs, hand held, canted, whip pans, pulling focus?

Take a printed version of the screen shots out with you to remind you of what you need to shoot in order to create the right vibe, look and energy. Also take a list of specific shots you need to help create energy and star image.

DSLR Menu Filming Settings

Standard

If you are going to use a DSLR to shoot your music video you are going to have to tackle the video settings.

The settings you choose will depend on:

  • Lighting and shadows
  • Motion or lack of
  • Depth of field

These are the settings that should work if you were to film outside on a sunny day.

Make sure the camera is switched to filming mode and then press the menu button on the back of the camera.

Page 1
  • Exposure
    • Auto will set a compromise between shutter speed, ISO and exposure
    • Manual if you want a very specific effect (bokeh or movement).
      • Only use this if you are confident & had experience with a DSLR.
  • Focus
    • Auto Focus (FlexizoneAF).
    • AF w/shutter button during filming (enable).
      • This will allow you to change focal length by pressing the camera shutter button whilst you are filming)
      • Ensure the lens is switched to AF
    • Manual Focus (for shallow DoF & pulling focus). This will give you control over the manual focus.
      • Ensure the lens is switched to MF & use the focus ring at the end of the lens to change focus
        • Only use if you are confident.
        • It might look in focus in camera but be blurred on a larger screen!
  • Contrast
    • High Light Tone Priority enable for filming in bright (sun)light to avoid light colours being washed out.
    • This will mean you cannot change other settings – these are done automatically
Page 2
  • Video System – NTSC
  • If you want to use slow motion in the edit.
    • Movie Rec Size: 1280×720 (60 fps)
  • If you want to get better quality colour & image definition
    • Movie Rec Size:  1920×1080 (30fps)


Test Shots

Standard

Link to a short video on how to shoot a music video – particularly the performance section.

https://www.bbc.co.uk/education/clips/zrpgkqt

You will need to work in your group to begin to understand how to get ‘coverage’ of your performer.  The worst thing that can happen and frequently does, is that the group return from filming to learn that they just don’t have enough shots, enough coverage of their star from various angles, distances and movement to make the edit interesting and dynamic.

You will choose a short 20″ clip of a chorus from your chosen song and elect one member of the group to be the ‘performer’.

Follow the directions for filming on the sheet attached.

You have two lessons to film this. Help each other out if you want to use performers from other groups.  Learn the lyrics overnight and if you want to try and get some generic MES, then great. The whole point though is to understand just how much footage you will need for one short sequence.

Have a look at Mrs C’s montages from last summer where she was experimenting with a DSLR and also the post production filters.


Music Video – Your Pitch

Standard

MOST IMPORTANT – LIMITATION IS STIMULATION

There are 2 filming days we have set up to make the production easier for you. Teachers and Year 13’s will be on hand to advise and support.

  • Candie Gardens/Town
  • Lancresse Common and Beach

You should endeavour to choose your performers/actors from within the Year 12 Media Students.  You can only perform in one.

You need to short list some songs (see below the guidance on choosing songs) and, using synesthesia, develop some tangible ideas for one of them. You should present your ideas as a inspiration board of found images / videos. You will need to consider the following: [box] The genre of music & repertoire of elements associated. The look of the band / lead singer. Locations for performance / narrative. Style of Performance. Costume / Make Up / Hair. Instruments. Colour Palettes. Narrative Events. [/box] Use this slideshare as a basic template (make a copy)  – individualise it and add extra information as and when you see fit: [box] Choosing a Song. Start with thinking, ‘Who will perform this?’ and work from there. Perhaps opt for a solo performer to make organisation easier. If possible choose people from within your class who could perform/act. Don’t choose something that is well known. Don’t choose something too long, 3.5 minutes is plenty. Album tracks or cover versions are useful options Beware of Warner Music Group and its associated record labels[/box]

TIPS AND ADVICE

  • Avoid showing or referencing overtly smoking, drinking, drugs as the majority of you are under 18 and probably so are your target audience.
  • Best to avoid mimed dialogue as it looks odd and people tend to laugh.
  • Avoid ‘dancing’ unless you can show us it will be ‘theatrical/performance’ based.  Synchronised swimming out of water is not useful to any narrative. Choreographed street dance etc for relevant genres is good – as long as you have skilled practitioners who don’t mind doing it, again and again and again.
  • Think about your performers:  are they available, will they be happy to film possibly on several occasions?  Do they have stage and film presence?
  • Do you have access to instruments, transport, locations and if not – focus on a single performer with no instruments.
  • Risk: We need to risk assess everything so unless you have access to firemen and adult lifeguards – fire and water are out of the equation.
  • Think: doable, can I film this in two shoots? studio shoots are not good quality light wise. Some of the best videos are the simplest but well shot and well dressed and well edited.

[box] Please listen to music on these site for inspiration: Glastonbury (BBC Introducing Stage) Balcony TV Unsigned.com Soundcloud goes here[/box]

THIS IS A LINK TO A PREVIOUS PITCH

Music Video – Previous Students’ Work

Standard

[et_pb_section admin_label=”section”]
[et_pb_row admin_label=”row”]
[et_pb_column type=”4_4″]
[et_pb_text admin_label=”Text”]
Here is a playlist of some of the best music videos made by students from The Sixth Form. They are an example of what is possible and moreover – what works:

Task:

Here are the assessment criteria.

Independent Study Tasks

  1. Embed the video (not the whole playlist), copy the level ladder and evaluate your chosen video in terms of how it reaches (or doesn’t) level four.
  2. Address each section in turn and using sub headings for your evaluation.
  3. Remember to EVALUATE the success of the video with reference to  the assessment criteria with SPECIFIC EXAMPLES from the video  and use  TECHNICAL TERMS.
  4. Remember to try and get in theoretical terms too (SIGNIFICANCE): ‘brand, break the 4th wall, genre,  code, star image, representation, narrative – almost like a mini textual analysis.

This is an interesting one from another centre.

[/et_pb_text]
[/et_pb_column]
[/et_pb_row]
[/et_pb_section]

Music Video – Synesthesia

Standard

Synaesthesia is a way of generating ideas from music – effectively ‘seeing sounds in your head’.

It is a really helpful technique to use when listening to music in order to come up with visual ideas.

When listening to a piece of music you should concentrate on each of the following features in turm:

  • Sense of subject matter
  • Grain of voice
  • Arrangement
  • Suggested Stories
  • Cultural references

Here is a Prezi which explains and illustrates these ideas:

Task 1 

  • You will listen to two songs and write down the images, ideas, colours, adjectives, themes, subjects that come to mind when listening to the lyrics, beat, grain of voice, tempo etc.
  • Then we will watch the videos and see how close you were to how the music was interpreted in visuals.


Music Video – Conventions – detailed analysis

Standard

Here’s a music video we’re going to complete a close analysis of, Katy Perry – Chained to the Rhythm:

You should type  up that analysis and embed it into the post called Close Analysis of Music Video.

Here is a blank version of the form you can use.

To supplement this, you must do your own close analysis. Choose another video from the list suggested and use the sheet attached (make your own copy) and do your own analysis.

This work is important as it shows that you are able to deconstruct the narrative, performance, star image and generic & technical conventions of a music video. This will help inform your own production ideas and help prepare you for the exam by starting to use all the terms that you need.


Kodaline – Love Like This

Lana del Rey – Born to Die

Muse – Time is Running Out

Taylor Swift – Wildest Dreams

Christina Aguilera – Say Something

Foo Fighters – Pretender