Teacher Feedback – screen castify

After we completed our second music video draft our teacher gave us some feedback via a screencastify, which is shown below. Her notes were on the most part positive but there are definitely things to improve upon.

Positives:

  • She thought the jump cut sequences were effective
  • Good editing to the beat
  • Likes the black and white colouring on the lip syncing shots
  • Extreme close ups of for example the eyes are effective

Improvements:

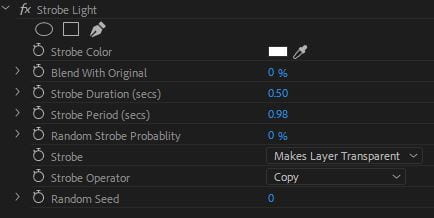
  • Likes the black and white colouring but it should be on all of the lip sync shots
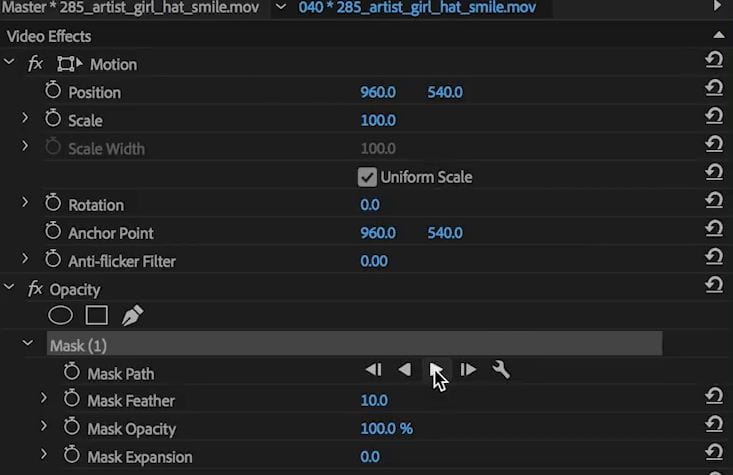
  • Zoom, scale and position some of the performance shots differently
  • Quicker pace and more close ups during the crescendo coming up to the last chorus
  • “Welcome to the” needs to be narrative rather than performance
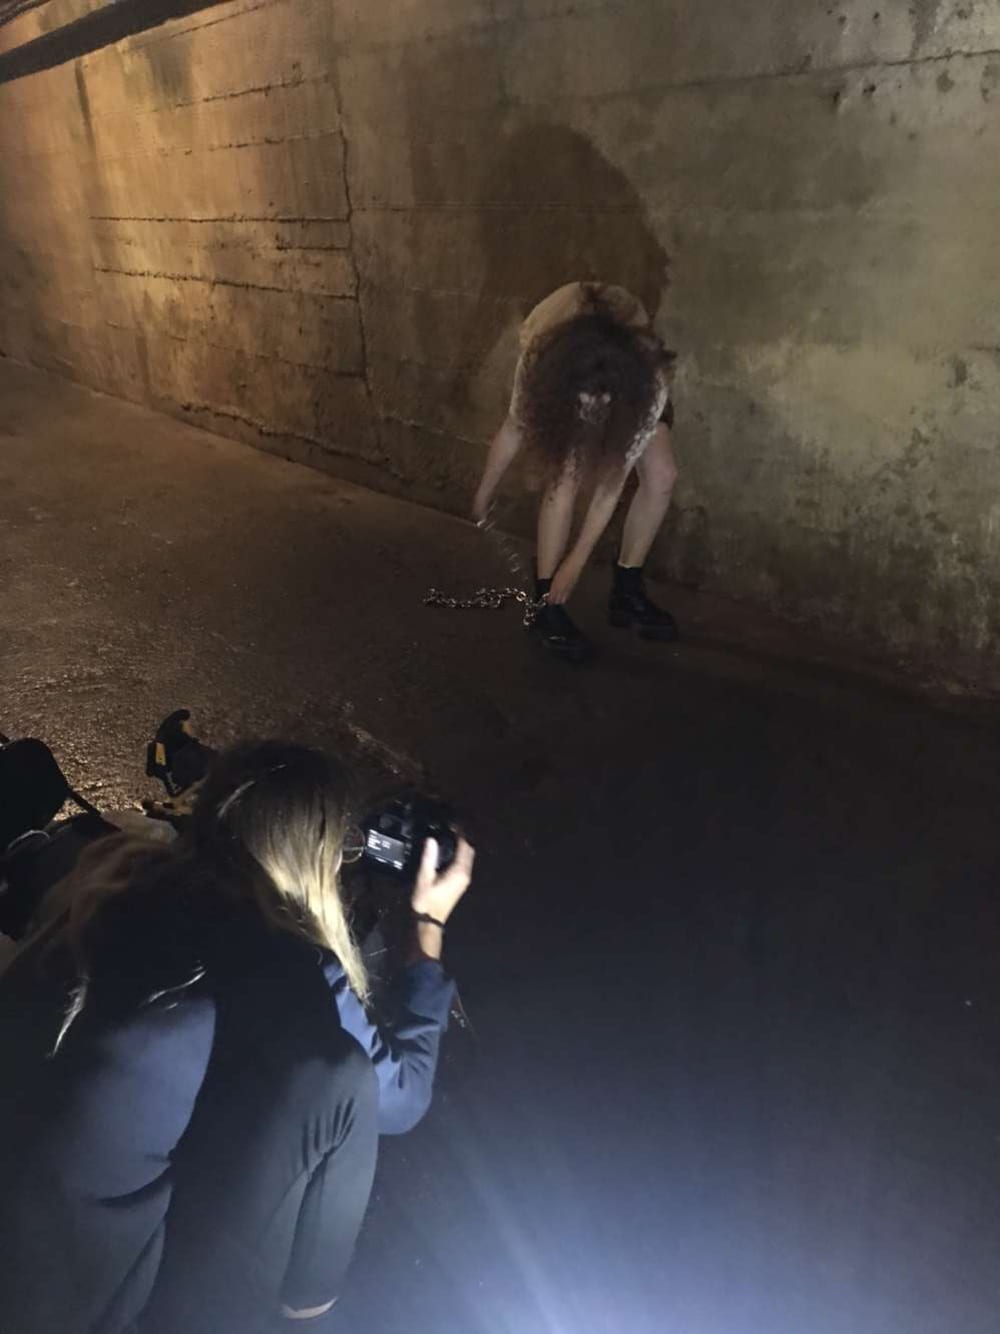
  • Make the second shot of the chains different e.g. flip or reverse it so people don’t know its the same
  • Try to lighten the clip in the wall as it is very dark


Music Video Draft 2 (Includes shoot 2 footage )

Below is our second draft for our music video. There are definitely things that we want to improve upon however I think that there are a lot of aspects in the video that are good.

What went well:

  • The jump cut sequences are effective at portraying our characters fear
  • Most sections are well edited to the beat for example the running montage in the last chorus
  • Good variety of shots e.g close ups, long shots, canted angles
  • Some sections are edited well with effects for example the first 10 seconds

Improvements:

  • Make sure effects are consistent
  • Add a title at the start that flickers with the clips
  • Quicken the pace of edit at points
  • Add filters to make the less in focus/grainy more useable

Design Skills 2

While making our second draft of our music video, we learnt many new skills and effects that we could us on our video to help portray the narrative and the electropop genre.

One tool that we found particularly effective in portraying our narrative was the strobe effect to strobe between different clips. We used this tool right at the start of our music video to start off and set the scene for our eerie and creepy  narrative. We wanted our target audience to feel uncomfortable and I feel like this effect helped us achieve this.

Another tool that made our music video more successful while also saving us time and effort was the adjustment layer tool. This tool saves us time as it allows us to put the same effect on all of our clips without having to put them on individually. Effects that were generally added were Lumetri colours as we wanted the same shade on all the clips as little variations would look out of place.

The mask tool was a tool showed to us by the Specsavers creative team. It is a tool that allowed us to isolate a particular part of the shot so that we could move that aspect or change it’s opacity or colour. It was this tool that allowed us to make the shot seen below. The mask effect really helps the shot fit in with our eerie and creepy narrative as it portrays our character being trapped within her mind.

Feedback

Earlier in the week the Specsavers creative team came in The Specsavers feedback was very beneficial as we now know how to do many new effects.

A particularly beneficial tool that they gave us was the mask tool. This allowed us to merge different shots and move them around the frame creating interesting and dynamic effects. Another tool that was helpful was the adjustment layer which when applied, applies the chosen effect to all the clips  below the layer. This will save a lot of time which leaves us able to create how to work out more effects and cuts which will make our music video more successful. Overall the team seemed to like our music video even though at the time we had not got a lot properly edited and cut.

Later on in the week, creatives from digital greenhouse came in to also look at our video. The team also liked our video but one correction was to quicken the pace of edit when the beat drops to mimic the beat.

An interesting tool that they showed us was how to make sure all of our clips are at the correct brightness and exposure. This is done by creating an adjustment layer and fixing the whites and shadows to get the correct level of contrast, light and exposure. This will be very useful and will save a lot of time as we won’t have to correct every clip and try get them to the same levels.

Shoot 2 Reflection (Narrative)

Below are some pictures of our location narrative shoot at the Guernsey German underground hospital. Overall I think that the shoot went well as we got a wide variety of shots and managed to get all of our narrative shots that were mentioned on our story board

Unfortunately some of our shots could have been better as a few shots were a bit blurry. We don’t think that we need to do another shoot but we might have to zoom some of our shots in to create more close ups as they were the shots that were the least in focus.

Our location also posed challenges as it was badly lit however we came prepared with lights however angling was difficult as we didn’t want many out of place shadows. However due to lighting, after looking back on footage, some shots are a bit dark or grainy. We could either choose not to use the shots or try and edit them to look better with lighting effects and Lumetri colour effects.

Narrative Development

Below is our extended step outline for our music video narrative shoot. Narrative is important within a music video as it creates excitement and tension and is generally the driving factor the engages people and makes them curious to watch it again which in turn equals more profit for the artist.

There are three kinds of narrative:

  • Disjunctive – The narrative has little or nothing to do with the song itself
  • Amplified – Themes within the music video narrative link to the themes within the song
  • Illustrative – The songs lyrics and meanings are acted out within the narrative

We have decided to do an amplified narrative and the planning sheet above will be helpful in making sure we have everything we need to make our narrative, and ultimately our music video, a success.

Todorov is a theorist who put forward an idea about how a narrative should flow. A narrative begins at an equilibrium until something disrupts it. After the disruption restoration happens and a new equilibrium is formed.

Our narrative generally follows this theory as in the beginning you can see the character sitting before her mind causes her disruption and the video gets more dark. At the end we are aiming to film the resolution of her breaking out of a door representing her dark thoughts however the new equilibrium will not be clear as to create mystery for the audience so that they will want to watch it again.

Music Video Draft 1 – Rough Cut

Below is our first draft of our performance music video to the song Panic Room by AU/RA:

I think overall, for a first draft, our music video is successful. I think this as, in my opinion, the music genre of electropop is well put across with the use of mise en scene and post production. In particular I think our mise en scene did a lot to get across our narrative and star image as the use of an all black costume in dark and dingy settings gave our music video an grungy feel. This represents our performer in the correct way as being edgy and dark like the original singer of the song.

However their are things to improve upon:

  • Add filters and colours onto more clips so the video looks more cohesive
  • Add transitions between clips to add further to the edgy feel that we are trying to get across
  • Move our performer around the frame using scale and position so that she is either centre in the shot or deliberately off centre.