Your Album Brand & Mission Statement

Standard

Remember the brief?

A promotion package for the release of an album, to include a music video (major task), together with a website for the band and a digipak for the album’s release (minor tasks).

It is important to note from the beginning that you are not making a digipack and website to advertise your music video! You are launching a new album, which contains that song, but which also contains a number of other tracks.

So before you start planning the print and web elements of this promotional package. You need to be clear about the mission statement for the whole campaign. You must think more holistically about the album and create an integrated advertising campaign…

Your Marketing Strategy & Mission Statement

Who is your Audience?

  • Who they are (demographics)
  • What other media they consume and participate in.
  • What their values attitudes and beliefs (ideology / psychographics)

A Call to Action

  • How do you want the audience to engage with your star / album
  • How will they invest time and money in your star / album

Who are the competition?

  • Name three similar bands / artists.
  • What are the trends in album designs of similar stars / bands?
  • What does their website look like?

Your USP (Unique Selling Point)

  • Is your star already established or are trying to establish a new presence in the market?
  • What is your star image & how are you trying to innovate / develop that image?
    • Are you mixing up elements of different genres?
    • Are you trying to re-brand your star?
    • Are you emphasising the ordinary or extraordinary?
      • Remember according to Dyer meta narratives include both.

Your Mission Statement.

  • In 50 words or fewer write an agreed mission statement that includes the central idead that will unify your brand.
    • This will include ideas represented in your music video, but must also bring in a wider range of ideas that you will develop as you make your 3D Moodboard.

TASK.

Complete this mission statement in production groups and copy it into your blog.

This blog post is essential for when you come to complete Creative Critical Reflection 2.

How do the elements of your production work together to create a sense of ‘branding’?

Continue reading

Draft 3 – peer assessment & feedback on YouTube

Standard

Attached is a sheet which lists who you should be sharing your Draft 3 with on YouTube.  The peers should then respond to the video in the comments section which you will snip tool and embed as feedback. Summarise and reflect on their feedback. When you are giving feedback make sure you use media terminology and provide some constructive criticism.  Make sure you review the videos that are shared with you, either directly or find them on the student blogs.  It is your responsibility to review their Draft 3 to enable them to move forward.

Once you have done please edit the document and highlight your name in green to say it it done.

Storyboard – essential planning

Standard

STORYBOARDS

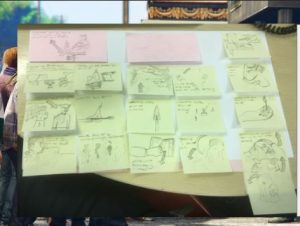
You need at least 40 post it note on A2 paper so that you can really sort out how you are going to shoot your narrative.  Think of all those elements you need to apply  – match on action, shot reverse shot, framing, 180 degree rule, pull focus, DOF, framing, angles and distances to help tell your story.

Here is some background reading to help you understand the purpose of storyboards and how they are designed. How to Use a Story Board

Here is a template for you to create your storyboard. You may use drawings or take photos to complete these. BFI Storyboard Template or you can use the post it style so that you can move your images around.

They need to be as detailed as possible and you should take a photo of them out on your shoot so you don’t miss a shot.

Remember to take inspiration from professional videos. Narratives tend to be more thematic and an amplification of the lyrics. Rather than an illustrative full story.

Stick men are fine but add in the detail of the type of shot i.e MS, LA ECS, Tracking, Pull focus etc….

Happy planning! 


Risk Assessment

Standard

You will have got an adult to authorise your filming off school premises and hopefully this has been submitted to your teacher.  If your performer’s are under-18, if they have not already got their guardians/parents to sign the parental permission form, then they danger-2will need to fill one in too – regardless of whether they are at this school or not.

BEFORE EACH SHOOT IN VARIOUS LOCATIONS

Before you go on shoot you must complete a specific shoot risk assessment. You must discuss this assessment with your teacher before the shoot and describe to them exactly what you intend to do and ask your subjects to do.  Each time you go to a new site, venue, location you will need to produce a new specific shoot risk assessment.

We will not give permission or our approval to any of the following:

  • Filming near the edge of a cliff or drop that could cause injury
  • Working with fire or combustible materials
  • Working in a location which is a designated building site or has been fenced off to public access
  • Filming in any private property, unless you have permission from the owner
  • Allowing someone to swim or play in open water which is more than 1 meter deep
  • ‘Stunt’ work that includes physical action sequences & includes reckless car driving

If you happen to have a responsible adult who is also a lifesaver or fireman then there may be exceptional circumstances allowed if they accompany you on the shoot but it all needs to be discussed well in advance.

THE RULES ARE AS FOLLOWS:

  • YOU  MUST ALL COMPLETE AND RETURN A SIGNED PARENTAL PERMISSION FORM FROM YOUR PARENTS TO ALLOW YOU TO FILM YOUR MUSIC VIDEO IN YOUR OWN TIME AND IN HOME STUDY TIME.
  • IF YOU PERFORMERS ARE UNDER 18 AND EITHER FROM IN OR OUT OF SCHOOL, THEY TOO MUST GET THEIR PARENTS/GUARDIANS TO COMPLETE A PARENTAL PERMISSION FORM.
  • YOU MUST ALL COMPLETE A RISK ASSESSMENT FORM THAT YOU DISCUSS WITH MRS COBB OR MR GREGSON BEFORE YOU LEAVE THE PREMISES OR FILM AFTER SCHOOL OR AT WEEKENDS. IF YOU RETURN TO A VENUE YOU WILL NOT HAVE TO REPEAT THE EXERCISE.
  • IF YOU ARE LEAVING SCHOOL DURING HOME STUDY YOU MUST SIGN IN AND SAY WHERE YOU ARE GOING.


Star Image – Representation

Standard

IT’S ALL ABOUT THE STAR IMAGE!

How the star/band/performer is represented in your video and on the digipak and website is crucial in constructing the values, attitudes and beliefs of the artist in the mind of the target audience.

REPRESENTATION, AUDIENCE AND OWNERSHIP ARE COMPLETELY INTERTWINED CONCEPTS!

WHAT IS THE INSTITUTIONAL PURPOSE OF A MUSIC VIDEO?

Music videos are made primarily to promote the star, in order to sell their music, in order to make money…well mostly!

They are also constructed to construct a set of desires in the target audience to be like them, think like them, love what they love, be involved in their lives & buy what they suggest.

There are huge synergies between marketing and star image! We don’t just buy a product we also buy into the values of the star image and in purchasing their product emulate them. Media representations of the star image is crucial in terms of raising an audience awareness.

STARS SHOULD BE STUDIED AND ANALYSED LIKE ANY OTHER TEXT!

They are essentially walking talking brands, who use their branding to advertise, publicise and sell to fans. Stars have to remain constantly interesting to keep the fans intrigued – the star image evolves and is constantly reinvented by media companies! In fact Stars could be seen as its own special kind of ‘species’.

RICHARD DYER

Richard Dyer Handout

Richard Dyer is a theorist you need to learn about. He came up with some concepts about how ‘star image’ works in the media. The link to the concepts booklet is in the menu at the top of the blog. Find it, add it to your drive, print it, LEARN IT!

TASK

CREATE A ONLINE CONCEPT BOARD IN PINTEREST/GOMOODBOARD STAR IMAGE (you can use any other collage app of your choice but you must be able to annotate the images you upload to it).

Your task is to take the ‘star’ (performer, duet, band, group…) you analysed when you did the genre analysis and create a ‘concept board’ on how they are ‘represented‘.

Find examples of news stories, incidents, events, digipak covers, music videos, articles, blogs, tweets that all contribute to their ‘star image’. The way they are represented is called their metanarrative (over arching story about them).

Image result for pinterest

And remember, just as you do in your TV drama analysis – you must add ADJECTIVES to how they appear through that particular event, story, picture etc. You can do this task as a group but must all equally contribute to the page.

This is a link to an excellent example. You should have at least 15 – 20 images and comments.

Performance Production Meeting Agenda

Standard

It is vital you are prepared, organised and ready to film your performance.

Remember to complete a Production Meeting Agenda and consider the following:

  • Carry out and complete risk assessments and get relevant permissions
  • Do your performer’s know their lines (have you printed them out in large print?)
  • Do you have your planning documents?
  • Do you have cameras, tripods, shoulder mounts, quick release shoes, batteries, SD cards (take at least 2 cameras and check they are charged etc)?
  • Do you have costumes, make up, accessories, shoes?
  • Do you have musical instruments?
  • Do you have microphones?
  • Do you have everyone’s contact numbers?
  • Do you have food and drink?
  • Will you set up in advance of your actors, performers arriving to cut down on hanging around time.

Genre analysis

Standard

TASK (this is collaborative so you can submit the same document but you all have to equally contribute).

Victoria Sponge! One way of remember what ‘genre’ is all about.

Create a Slideshow with a voice-over or a Voicethread focusing on the Repertoire of Elements necessary for your particular band /artist to be generically conventional.   You could also use Screencastify to record your voice over. You can then embed it in your blog. You could  also mention print design.  You can probably already use a lot of your ideas from your song pitch but be careful not to just copy this but instead use it as a foundation for exploring the genre of your song and how this will impact on the video, web pages and  digipak.

Some of the suggested areas of music videos to cover are on this sheet but you should consider:

  • Website of similar artists
  • Album art from similar artists
  • Videos of similar artists

Find generically similar artists.

  • Discuss who they are, what do they wear, how do they style themselves, where do they perform, who are their fans, how are their digipaks / videos similar, what common features are there in their music videos (fast paced editing, hand held camera, filters, locations, authentic/live performances, produced performances etc). Use your performer too in among the analysis.

Use this document to structure your slideshow

Ensure you get the following terms in to your presentation and also your introduction and reflect on the value of the task in the blog:  

  • Repertoire of elements
  • Conventions
  • Blueprint
  • Predictable pleasure
  • Contract
  • Label
  • Target audience

Consider ‘genre’ as you produce your video and it will be so much easier to talk about if it comes up in the exam in Section 1b. 

Here is an example from last year

Music Video – Performance Shot List

Standard

Instead of a written list of shots we want you to create a visual shotlist of the kind of shots you want to include in your performance shoot.  Now that you have filmed a very short performance sequence, you know how many shots you need just to get coverage.  This is a group effort so share a slideshare amongst you.

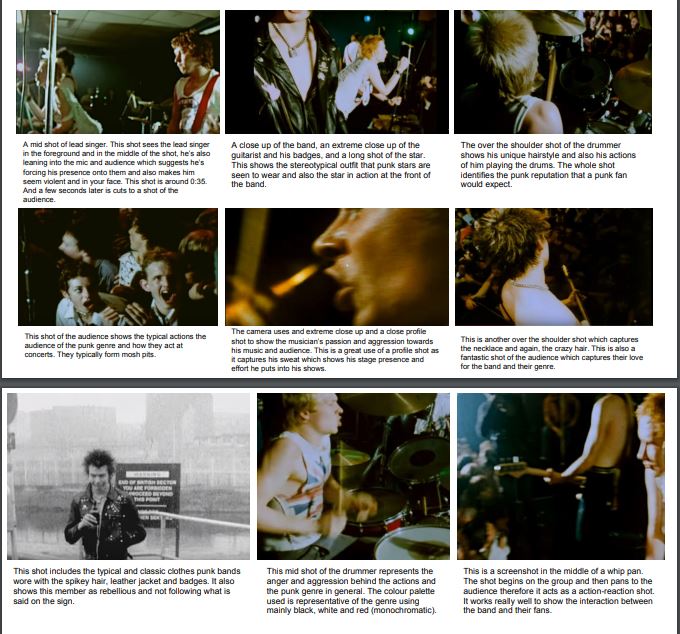
However, certain genres rely specifically on certain shots as part of the repertoire of elements.  For example heavy rock might be canted, hand held camera shots with whip pans a plenty. Indie acoustic might be much smoother, longer, pull focus shots.

You should study other bands of a similar genre and collate @ 10 screen shots of conventional shots, frames, angles they use in their performances. You should look at at least 3 – 4 other music videos and use shots from these. You will then title the shots with an explanation of the shot i.e. close up of guitarist’s instrumental mastery; whip pans between band members looking at each other; master long shot of band performing as a unit; mid shot pan of band members; extreme close up of lead singer’s expressive face and vocals etc. Always add in some textual analysis….how does that shot help represent, connote, convey, portray the star?  YOU NEED 9 DIFFERENT TYPES OF SHOT; distance, angle, framing, movement, special.

Clearly a lot of the energy and dynamics will come from the edit in post-production but you will need a variety of shots of the performer from different angles with different movement to give yourself adequate footage.

Remember:  take at least 2 cameras for your performance shoot and get the band to sing the song several times through and take complete footage of the song being performed from different angles, distances and with different movement.

Also think about shots where movement happens through the frame…i.e. feet or people walking across the screen? What about POVs, hand held, canted, whip pans, pulling focus?

Take a printed version of the screen shots out with you to remind you of what you need to shoot in order to create the right vibe, look and energy. Also take a list of specific shots you need to help create energy and star image.

Test Shots

Standard

Link to a short video on how to shoot a music video – particularly the performance section.

https://www.bbc.co.uk/education/clips/zrpgkqt

You will need to work in your group to begin to understand how to get ‘coverage’ of your performer.  The worst thing that can happen and frequently does, is that the group return from filming to learn that they just don’t have enough shots, enough coverage of their star from various angles, distances and movement to make the edit interesting and dynamic.

You will choose a short 20″ clip of a chorus from your chosen song and elect one member of the group to be the ‘performer’.

Follow the directions for filming on the sheet attached.

You have two lessons to film this. Help each other out if you want to use performers from other groups.  Learn the lyrics overnight and if you want to try and get some generic MES, then great. The whole point though is to understand just how much footage you will need for one short sequence.

Have a look at Mrs C’s montages from last summer where she was experimenting with a DSLR and also the post production filters.