Exploring Band Web Sites

Standard

Understand the Media Form (Band Websites)

  • What are the conventional pages & typical information on a music / band website?

User Experience

  • Can the user find what they need / expect?
  • How many clicks away from the home or splash page is the information and content?
  • What is the call to action and how is that promoted on the site?
  • What tools / experiences does the site offer?

Analyse the Design

  • How does the design of the site reflect the brand image?
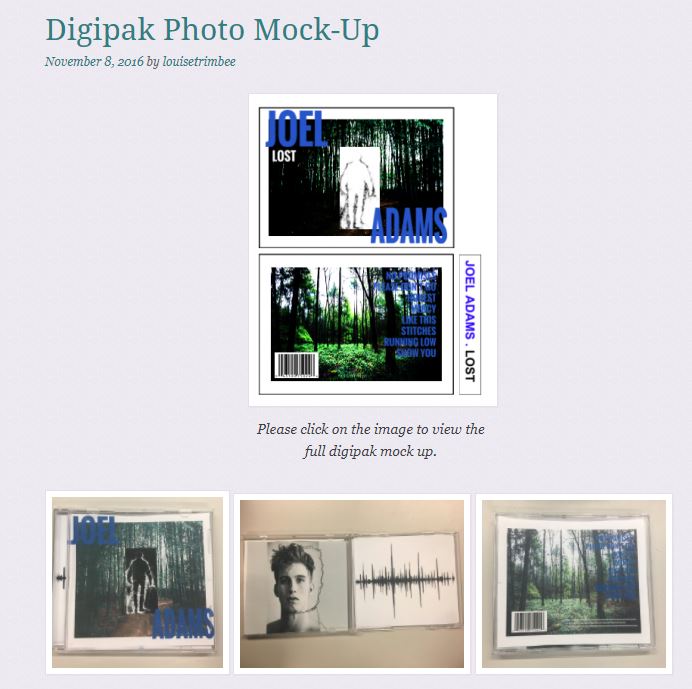
  • How does the digipack and video design reflect in the website?
  • Does the design and layout of the website suit the target audience?
  • Is the design consistent across the pages?

Professional Examples

TASK

Create a Screencastify which explains, discusses and analyses one of the professional websites above.

Your voice over should cover:

  • Navigation of the website
  • The links to social media
  • The content in the website
  • The call to action and how that is evident in the site
  • The design of the website in relation to their other media (video and digipack)
  • How does it address AIDA – basic design principles of attraction, interest, desire and action?
  • It should include the appropriate terminology for website conventions and forms.

Here is an example analysis from Mr G. Does he cover everything?

Website – the other ‘minor’ task

Standard

Now that you have your Music Video and your Digipak which features the music video song, you need to design a website to promote the new video, digipak and the performer.

This is how the overall product is described in the CiE specification and below is also what they will be expecting to see in the research, planning, development and evaluation of the package, including the Website.

This website is going to pull all your branding, productions together and work as an online promotion for your performer.

First of all though, as with all Media Production – you need to know the ground rules – the basics; those technical terms to describe the media forms and analyse the conventions.

Now that you know the general ‘raison d’etre’ of websites and the basic terminology involved in their design, it is now your turn as an individual and as a group, to complete the following tasks over the next couple of weeks.

  • Blog Post 1 – individual description and analysis of a couple of music websites and annotate for the technical forms and conventions (terminology).
    • Use the glossary and terms from the above presentation.
  • Blog Post 2 – a group Screencastify on a particular music website – describe its use of web page features and analysing it for meaning linked to star image & branding. Use the terminology.
  • Blog Post 3 – an individual analysis of previous student’s work.
  • Blog Post 4 – a group flow chart showing how your website will work in terms of pages and a discussion about your preferred and chosen platform (Wix, Weebly or Divi).

You can then find a free template on Wix, Weebly or design your own on Divi (if you are in Mr Gs online portfolio class) and get creative.

Everything needs to be done by half-term so that when we come back after half-term we can complete the final Creative Critical Reflections.

Good luck.

Photoshop manipulation

Standard

You can manipulate your photo in photoshop before exporting and placing into Indesign.

  • The tool bar at the top has a category called FILTER. In here you will find all kinds of presets to change how your photo looks – adding presets to make it look like a pen and ink drawing, mosaic etc.  You can also use the Liquify tool to alter the image – real photoshop territory and make eyes bigger and legs shorter etc.
  • The other tab on the tool bar called IMAGE options to change the colour to black and white, add gradient shadow to the background and change the exposure etc.

Creative backgrounds for the DP

Standard
  • DP Backgrounds – be creative – get out and take shots!

    Click on this link to open a file with all kinds of backgrounds that I took at home last night. As black canvases they are not particularly exciting but take them into photoshop and play with the filters and liquify and you could end up having some really funky backgrounds for your Digipak.

    You have to get some shots in – experiment and look for angles, perspectives, textures and composition of random objects.


  • Contact Sheets

    Standard

    How To:

    Make sure ALL of your photos are in your project folder in the D Drive.

    1. Open Photoshop & Your Blog
    2. Go to File>Automate
    3. Select Contact II
    4. Choose the Folder where the images are
    5. Select how many rows and columns for you contact sheet 4×6 is OK, but depends on the number of photos.
    6. Export as a PDF & Jpeg and upload to your blog.
    7. Below the contact sheet – put the image(s) that you are going to use in your design

    Digipak – PMA, Risk Assessment + TEMPLATES

    Standard

    This week you should be planning, executing and producing your Digipak.  Make sure your planning is precise and comprehensive. All planning documents should be uploaded to the blog. You will have to organise your group, models and performers. Remember you have fewer lessons this week so you need to work in a focused manner.

    Attached to this post are links to shot lists, agendas and digipak templates.

    You should also use Adobe Indesign to create your templates. You can choose one from the list.

    Use Photoshop to amend, edit and manipulate your photos and Indesign to construct the actual Digipak.

    You must also include your contact sheets in the blog and give an overview of which shots you finally choose and why. Make copies of the PMA and RA sheets.

    Production Meetings Agenda

    Risk Assessment

    4 Pane

    4 Pane

    Front Cover

    Back Cover + Folds

    Inlay Behind CD

    Inlay Front

    These links may be helpful in setting up the templates so that your work is the correct size in Adove Indesign although there is one in there already as a template.

    https://support.discmakers.com/hc/en-us/articles/209098677–Using-our-Templates-with-Adobe-Photoshop

    http://www.discmakers.com/templates/digipaks.asp

    USING THE STUDIO AND FLASH PHOTOGRAPHY – demonstration workshop later this week.

    Photographic Inspiration

    Standard

    This website has lots of ideas from artists and media makers around the world. It might just offer you some inspiration for your MES – remember simple but meaningful use of MES could make all the difference: some broken plates, antique books, a bright red balloon, tattered armchair, sleek hair do, interesting window frame, bright red lipstick, beaten up car etc.

    However, be careful not to over stretch yourself. Look at previous student’s work and see what is likely and possible. You may have to ‘cut your cloth’ (plan one’s aims and activities in line with one’s resources and circumstances) and do something simple and brilliantly as opposed to attempt something spectacular but badly.

    Here are some links to some specific pages that could whet your appetite:

    Continue reading

    Digipak Photo Mock up and Feedback

    Standard

    You need to create a digital ‘PHOTO MOCK UP‘.

    For this exercise you can borrow images.

    It is this version that will need feedback.

    Exemplars here and here.

    • Place the BORROWED photos in a clear CD cover and take photos of how it looks.
    • Then create a tally chart – list @ 6 possible music genres (including your one) and ask @ 20 students what genre they immediately see, sense, read when looking at the digipak.
    • Reflect on the results. Are you on the right track? Have you got the right style, fonts, images to convey the star image and genre?
    • Have a selection of adjectives, responses that you are hoping that the audience will pick when decoding the DP prototype and add in some that you don’t want them to read into it. then get them to circle 5 or so. If their responses are right, then you are on the right track – if not, then you will have to redesign.
    • If so, you now need to get out and start making the actual DP.

    We will be moving on to Production Meeting Agendas, Risk Assessment and first shoots very shortly so make sure you have caught up on all your posts.