Digipak Photo Mock-Up

screen-shot-2017-01-02-at-14-35-00

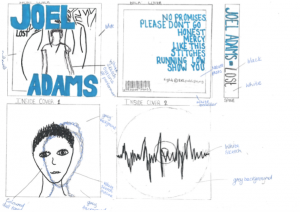
Please click on the image to view the full digipak mock up.

img_1465 img_1466 img_1467

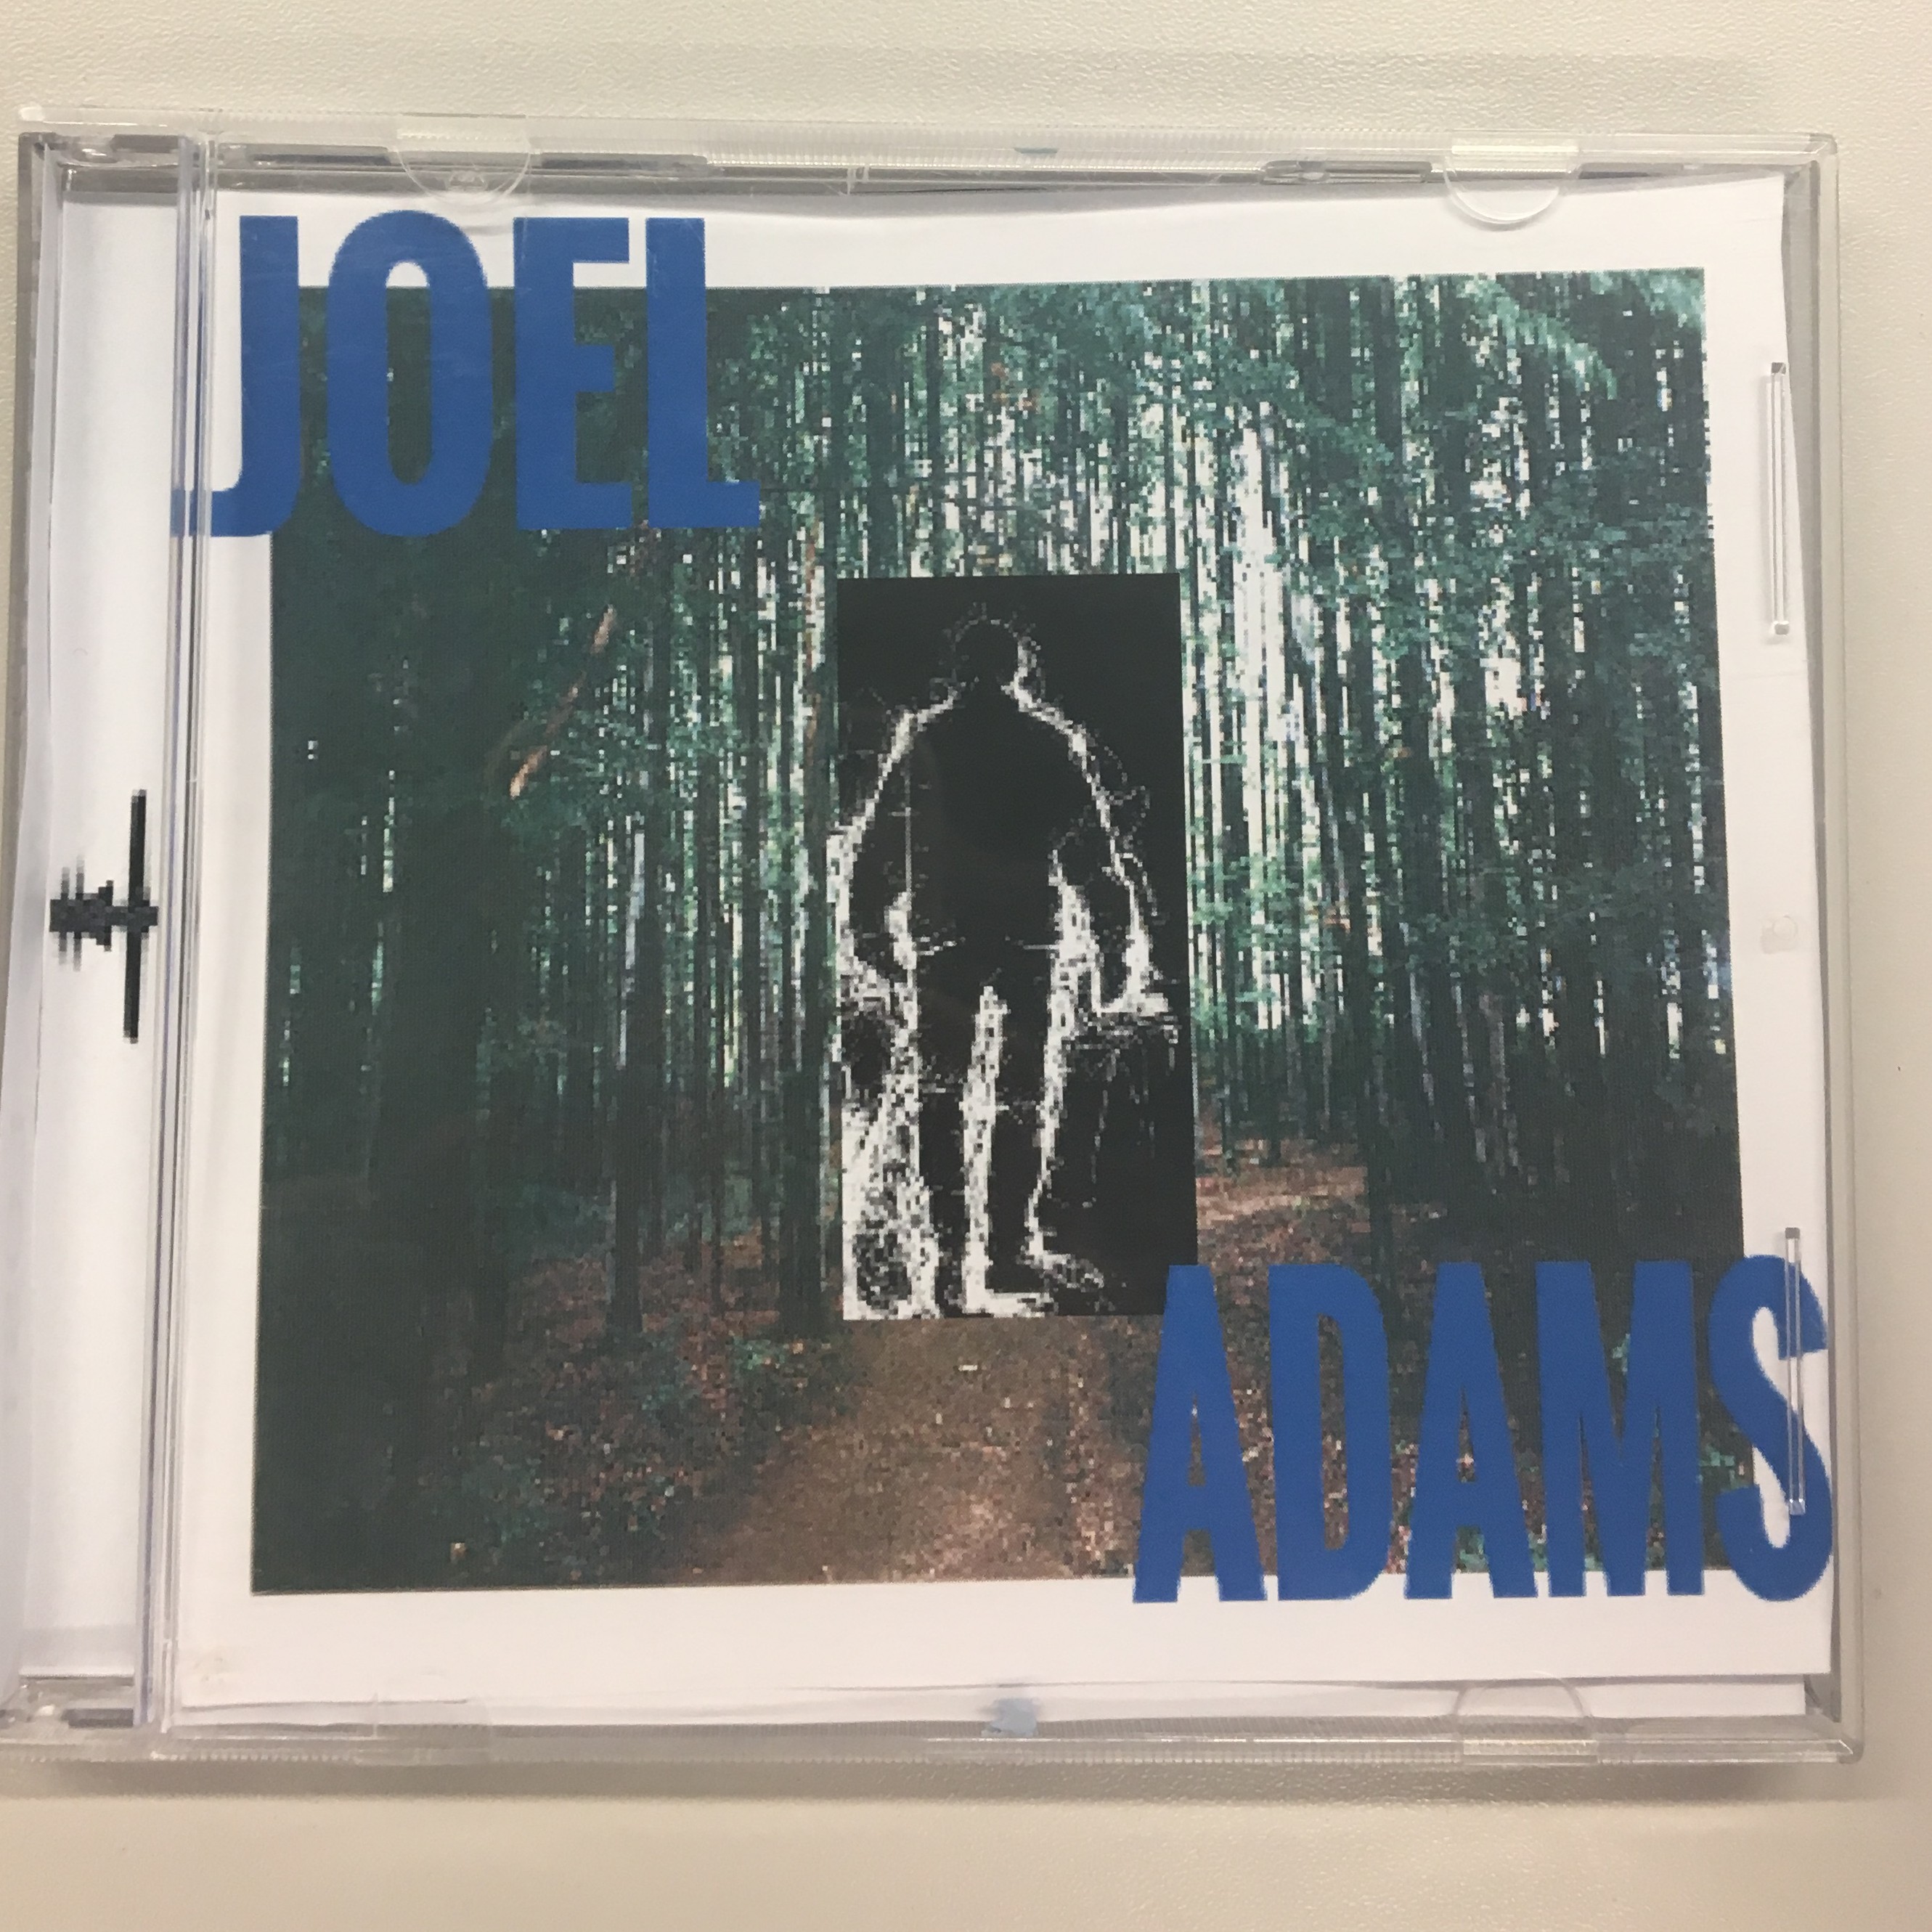
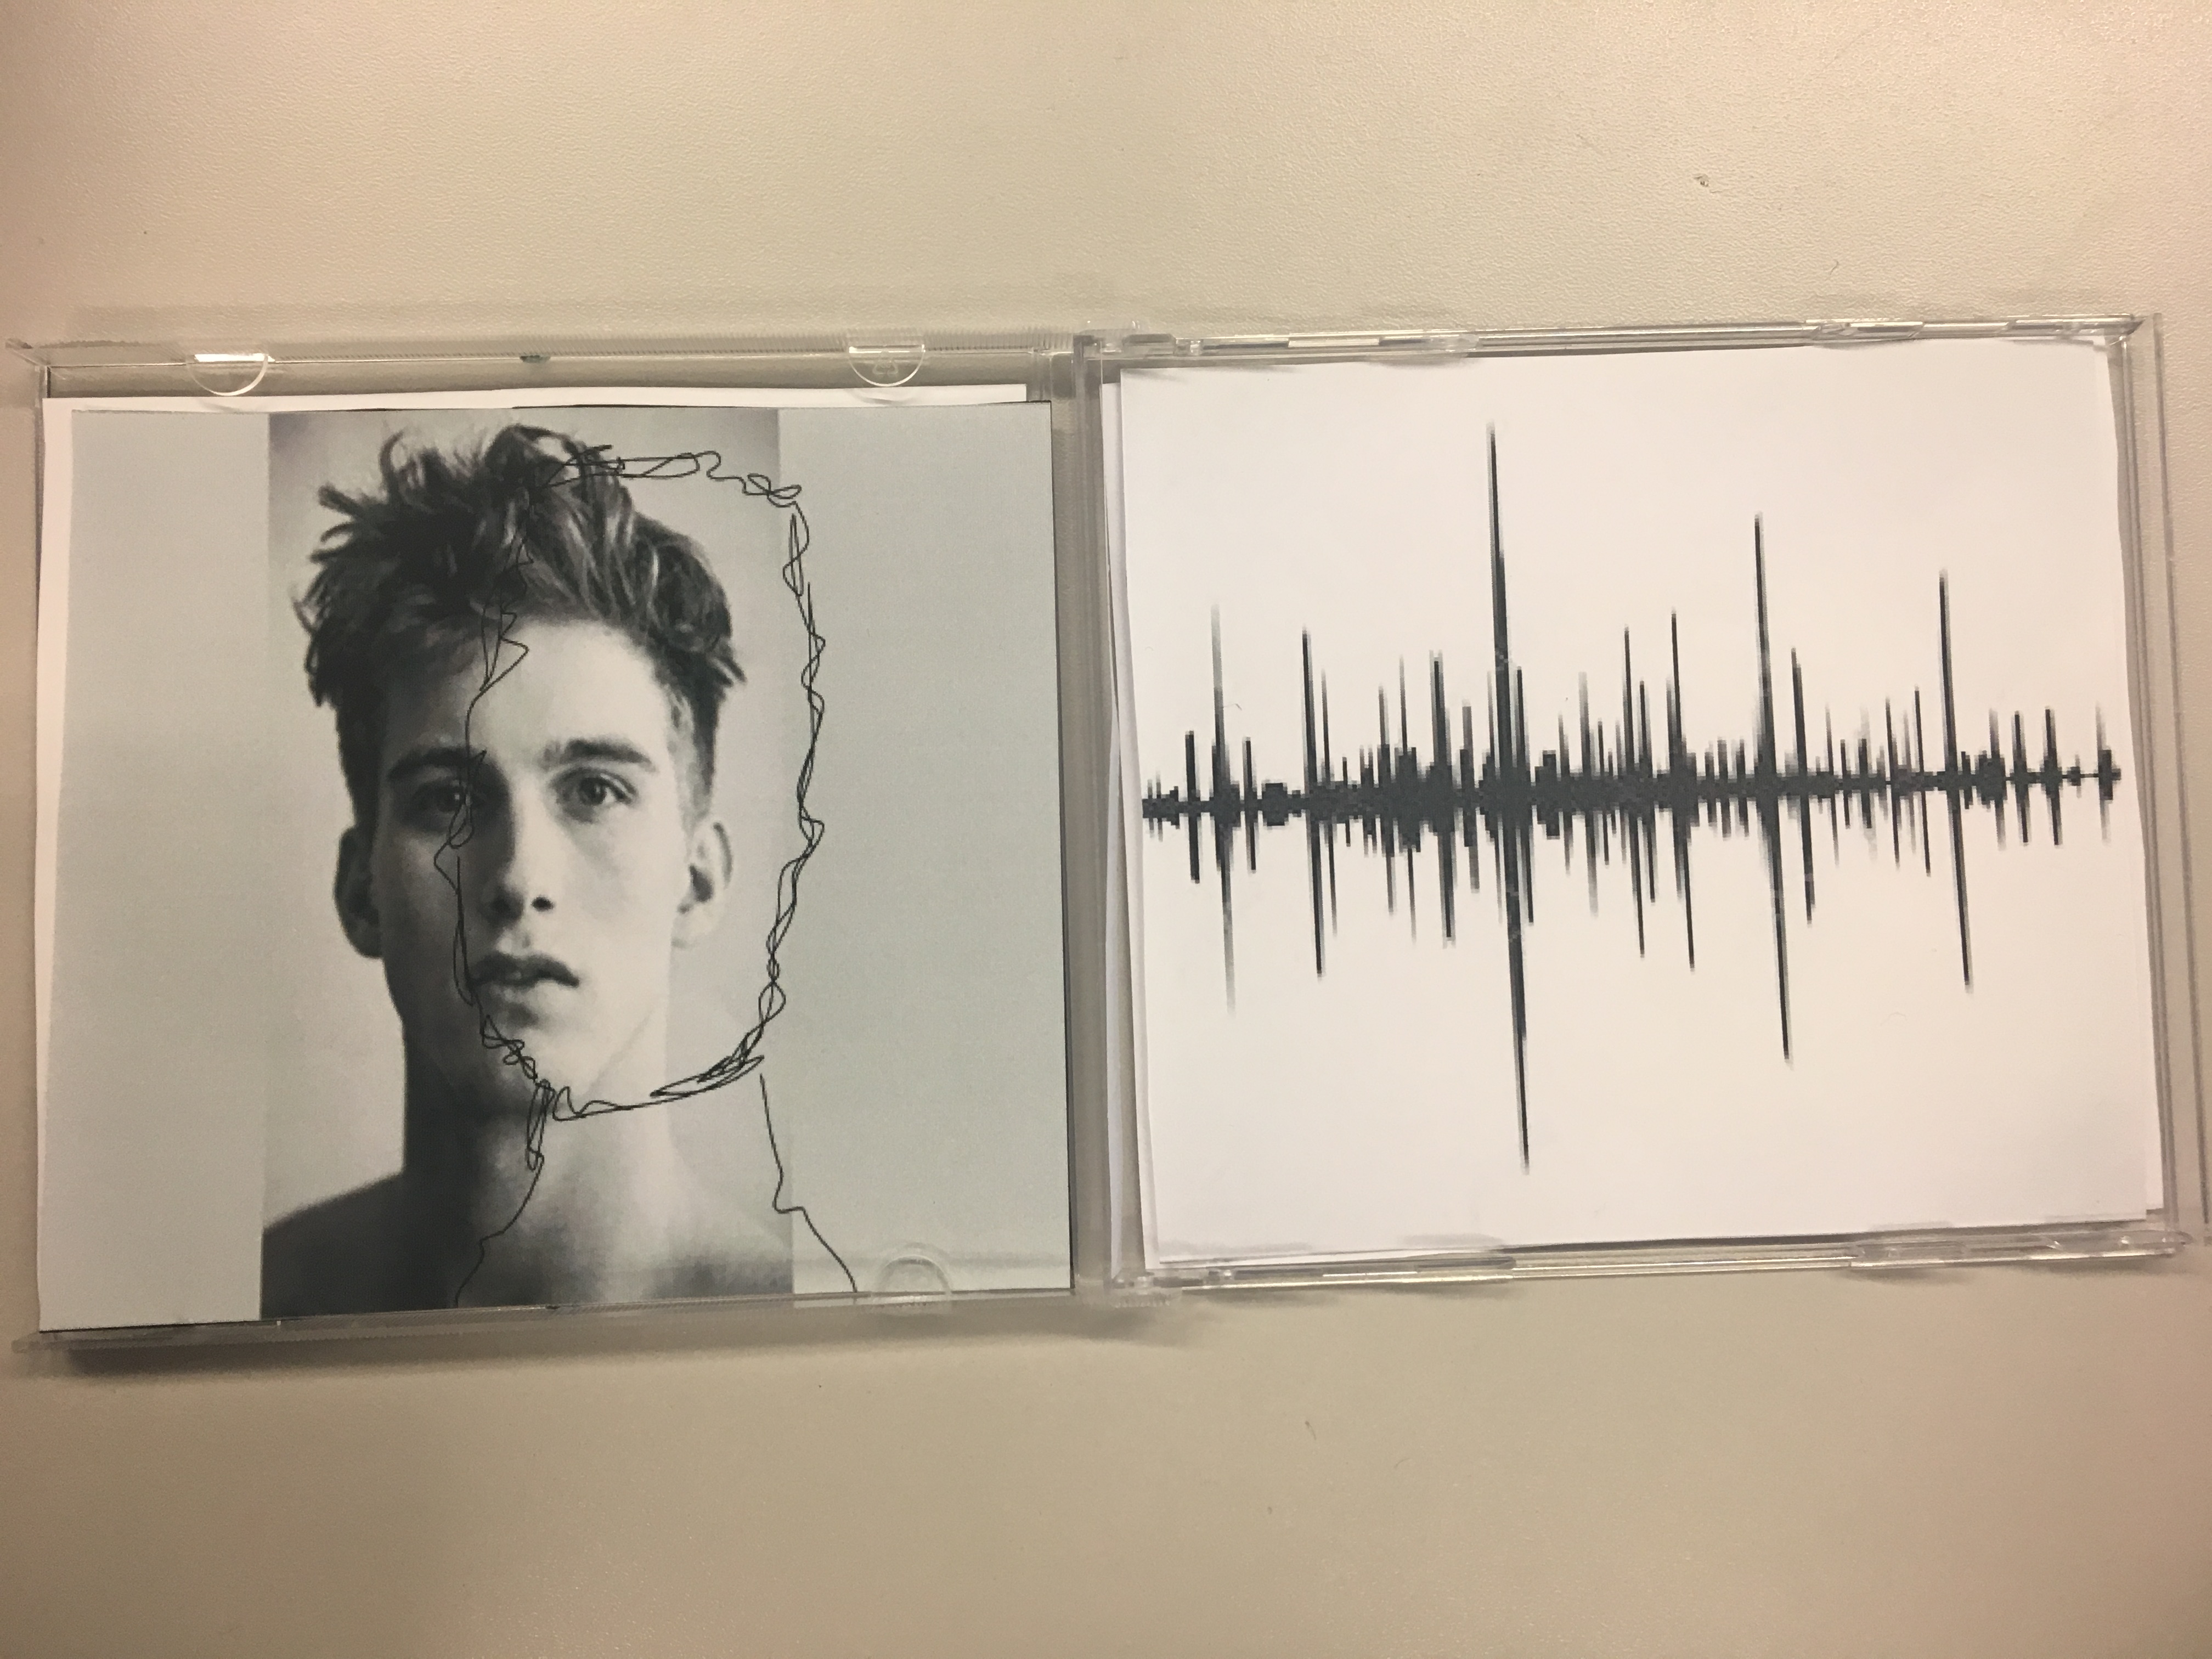
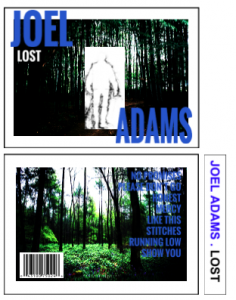
Here, we had to create a digital version of what we hope our digipak will eventually look like. We took images from online to make a rough drafted idea of our future digipak. On our front cover, you can see we pictured a scenic forest background with a sketched outline of a male figure in the centre, we then have our artists name and album cover here too. Again, the back of our album is also fairly similar, with a forest background and the same font used for the song names. However, we have also included some of the conventional features, such as; the barcode and album copyrights. As you can see, we have a running theme of an almost sketched authentic look, we included this on our inside panels too. We hope to shoot a portraiture image of our artist then sketch his outline over the top.Furthermore, for the right hand side we will have the sound wave of our song. Moreover, we have kept our spine simple to compete the digipak’s overall style, it simply inflates the artist name and album title.

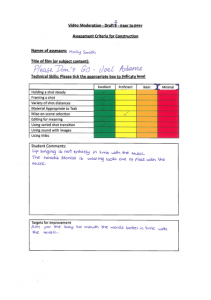
This task enabled us to see what would work well in our digipak and what we perhaps need to make slight alterations to. We decided that the running ‘sketched’ theme worked very well with our album and artist star image, due to the fact it simply completed the authentic simplistic image that we were aiming for. However, after completing this task we are now not too sure about the colour of our artists name on our album cover, we feel it looks a little random and therefore we plan to change this in the production stage.

Digipak Mock-Up

screen-shot-2016-11-14-at-14-20-02

Please click on the image above to view our digipak mock up in more detail.

After completing our digipak research, we felt we had enough sufficient knowledge and understanding to create our very own one. We decided to follow the same sort of theme that an indie- pop genre album cover would normally have. Moreover, we believed that there should infact be a significant connection to nature, as this seems to be a common running theme throughout the preferred genre. We also like the idea of having an almost ‘sketched’ theme throughout our digipak. Furthermore, we thought this would be our direct link to the indie genre and therefore we thoroughly believe this idea will work very well in our digipak.  We also felt that we ensure the the digipak remains simple, as once again we believe this will most definitely fit best with our chosen genre. Moreover, we have also decided on an almost dull toned colour theme to ensure there is a clear link to the indie genre, however we also would like a bright pop of electric blue running throughout our digipak.

From this task, we have learnt just how important it is to plan out a set idea for the digipak before we actually begin production. This will ensure that we use our time effectively and therefore create a digipak that really links to the artist’s star image. By completing the above document, we are now a lot more prepared to create a physical copy of our future digipak. Furthermore, this also allows us to see our idea before actually creating it. This has allowed us to really analyse if our idea will actually work and correspond with the entirety of our project.

Digipak- Moodboard

screen-shot-2016-11-01-at-16-56-57

Please click on the above image to view my moodboard in more detail.

Here, I displayed that I feel as if we should have a clear link to nature. I like the idea of there being blue tones and a bold, structured font that dominates the front cover of the digipak. Moreover, I believed that the image should be very simple and therefore strongly like to the artist’s star image.


moodboard

Please click on this image to view Kirsty’s moodboard

Kirsty had a few similar ideas to me, she also envisioned blue tones in the digipak describing them as ‘calming colours’. She also suggested that perhaps we experiment with the concept of double exposure to make the digipak more visually appealing.

ellie-mb

Please click on the image above to view Ellie’s moodboard.

Ellie decided that she thought the digipak should be simple, yet still artistic. Moreover, it was also clearly stated here that she (like me) wanted a bold heading that would stand out and capture the viewers attention. Also, ‘relaxed colours’ also seems to be a necessity here and a strong sense of ’emotion’ appears to be essential.

For this task, we had to compile a selection of images. These pictures were elements that will eventually help us with the creation of our digipaks. Here, the initial ideas are placed and therefore from this we can start to conduct ideas and begin to construct the final product. We had to focus on things like font, colour scheme and finally image ideas. Eventually, all of these aspects will aid us to create our final digipak. Above, you will find firstly my moodboard, followed by Kirsty’s and then Ellie’s.

By making this moodboard, I have realised just how important it is to first ‘brainstorm’ your ideas before jumping straight into the production stage. This ensures that any bad ideas are immediately disposed of and those that work well are most definitely put forward into the production stage. Moreover, by completing this task we can now see common thoughts amongst the group and therefore we will be able to explain our ideas better and work cooperatively as a group. A few ideas we are hoping to pursue, is the use of blue- toned colours, block text and an almost sketch portraiture drawing of the artist. All of these ideas are displayed in the moodboard I created above.


Digipak- Previous Students Work

screenshot-2016-11-01-at-15-04-22

screen-shot-2016-11-01-at-17-40-11

Please click on the level ladder to view it in more detail.

For this task, we had to pick a previous student’s digipak to critically analyse. Furthermore, I looked in detail about many different aspects, including elements like the images used (for example the picture of the road sign), font, colour and use of ICT skills the group have displayed in their digipak. Moreover, we can also see how elements like the grey beanie (one performer is pictured wearing) helps to display connotations of the preferred genre, as their is a clear link in the mise-en-scene between this digipak and others that belong to the same genre. I also think that the ‘rustic’ looking door appears very fitting to the artist’s image and metanarrative, therefore I feel this aspect also works very well. I decided to choose the group who did the song by the indie group ‘Wolf Alice’. Here, I had to look at the following aspects and discuss how well I believed the group carried out these tasks, these were:

  • Framing a Shot
  • Variety of Shot Distances
  • Appropriate to Task
  • Mise-en-scene Selection
  • Manipulating Photos
  • Language and Register
  • Integration (I & C)
  • Layout and Page Design
  • Fonts and Text Sizes
  • Use ICT Properly

Here I analysed the digipak on the above criteria, writing about what I thought they did well in each section and whether I thought it was conventional to the particular genre they were exploring:

screen-shot-2016-11-03-at-17-15-43

Please click on the image above to view the image in more detail.

From this task, I learnt just how important it is to do each section to the best of my ability. By ensuring that each topic area is fully thought out and developed, we can make sure that our digipak is to as much of a high standard as possible. Moreover, I learnt from analysing this particular digipak what elements work well and which could be done better or even avoided. This will allow me to be more experienced when I go on to create my own digipak in the future, as I now have a much better understanding of what actually makes the perfect digipak. I would personally give the above digipak a lower level 4.

Digipak- Conventions Analysis

screenshot-2016-11-01-at-09-53-15

Please click on the image above to view the document in more detail.

Here, I had to analyse an album cover which is of the same genre as our chosen song. I decided to pick the album ‘Blue Neighbourhood’ by Troye Sivan, I felt this was an appropriate choice and really linked well to our song ‘Please Don’t Go’ by Joel Adams. Moreover, this taught me which aspects were conventional to an album cover and specifically an album from the genre indie pop. These particular items included:

  • A front cover including: a picture of the artist, their name and an album title.
  • The back cover displaying: a barcode, list of songs (usually about 8-12), a copyright logo and the publishers name/logo.
  • The spine of the album, usually showing the artists name and album title.
  • A leaflet which generally contains the lyrics of the songs included.

From this task, I learnt just how important every aspect of the album cover is. Each element shows a clear representation of the genre portrayed and therefore it is essential to make sure the cover really connotes the artists star image. Aspects like the colour, font, title and image all demonstrate the image of the particular genre, immediately drawing in the focus/ attraction of the preferred target audience. This enables the producers to estimate the predictable pleasure expected and therefore they can normally calculate how well the album will actually do.

Music Video Draft 4 Feedback and Targets

For the last piece of feedback on our music video, we thought we would carry out a more in depth process. Therefore, we decided we would film two of our peers watch our video, while commenting on things they think work well and elements that could be improved. We believed that this would be one of the most effective methods of feedback and therefore we decided to leave it until last. Simply, we believed this due to the fact that the viewer can comment on things as the video plays and therefore they can say whatever comes to their mind at the time. We felt that this would be very effective and therefore we would be able to efficiently collect the necessary feedback.

We believe this was a very useful piece of feedback and due to this we were able to make the few minor alterations that will improve our video. Upon reviewing our feedback, we looked at the targets we needed to complete, these were;

Targets:

  • Change a few of the performance shots, do this so there is no odd ‘leading space’ when we see the performer on the screen.
  • Perhaps experiment with the colour of the food colouring we see in the water shots. This will make a much better connection to the rest of the footage/ video.
  • Make sure that all the shots run smoothly and there are no strange glitches in the transitions between each individual shot.

Music Video Draft 4

We had now completed our fourth draft and have started finalising our product. Here we worked on refining our editing and therefore making sure everything followed seamlessly together. Moreover, we also began experimenting with elements like motion and cross dissolve in order to really make our sequence look as professional as possible. We also decided to increase the speed of our editing here in order to make our video a lot more visually interesting and therefore exciting.

To reach our ‘final’ product we simply need to make a few more minor adjustments to our sequence. We will be working on factors like the colour correction and timings of each shot. Furthermore, we will also simply look over the sequence as a whole to ensure we are satisfied with our end result.

Music Video Draft 3 Feedback and Targets


For this feedback, we decided to film a few short clips or verbal feedback. We thought this would be an effective way to gain short, precise comments that we needed to make the few adjustments to our video that would improve its visual appearance to the audience. Therefore, we filmed several 3-6 second clips were each individual stated an element they liked about our music video and two things we should either change or improve on.

From this task, we have learnt just how important it is to receive advise from fellow media students.This will help us to achieve a much more professional product and therefore really connect with our target audience. This is simply because they are receiving the predictable pleasure from the content that they are viewing. By working on the elements we need to improve, we hope to make our video a lot more conventional for the audience end to its genre.

Targets:

  • Have a faster pace of edit that really corresponds to the beat of the music.
  • Include more footage in order to fill the blank spaces.
  • Make sure to fix the leading space in a few of the performance shots.

Music Video Draft 3

Above is draft three for our music video ‘Please Don’t Go’ by Joel Adams. For this draft we continued to edit our video to improve it further. Here, we simply incorporated more footage and tried to perfect our editing throughout the entire sequence. We used items like the razor tool, exponential change and sightly adjusting the speed/ duration fir a few of or clips. Moreover, we thoroughly believe this has taken our video further and therefore there has been a significant improvement since draft two.

However, despite these new changes we hope to make our music video even better in our next draft. We will be continuing to fill in missing footage and make sure we are happy with the way in wit the video as a whole is edited. Furthermore, we will also be concentrating on the small details too, for example: colour correction.

Music Video Draft 2 Feedback and Targets

screenshot-2017-01-05-at-09-31-18

Please click on the image to view all the feedback forms.

Here, we handed out feedback sheets to a few of our peers.We asked them to watch our video through and comment on what they felt needed to be improved, they all had to rate us on elements like ‘holding a shot steady’ and ‘mise-en-scene selection’. Our peers, here, had to rate whether we did each task ‘excellent’, ‘proficient’, ‘basic’ or ‘minimal’.  Once completing this section of the feedback sheet, they were then given space to right any extra comments and then a few targets. We asked each individual to complete the sheet to the best of their ability in order to receive the feedback we needed to improve our video further.

We learnt that gathering this kind of critical feedback was necessary in order to really achieve a worthwhile project that appealed to the audience we were targeting. By listening to the feedback given, we are now able to return to our video and continue to add, edit and improve the content we already have. We hope that by draft three, we have completed all of the following targets.

Targets:

  • Improve the annunciation of the male performer, to ensure that the lip syncing looks professional.
  • Experiment with a variety of editing techniques.
  • Ensure that there is a more meaningful connection between the two performers.