September 23

Teacher Feedback – screen castify

Our teacher completed a screencastify after watching our music video with some suggestions for us on how to improve but also what he liked and he thought worked well.

What went well:

  • Good footage in focus and well lit
  • Lip Sync is perfect
  • The narrative is clear
  • Great make up/hair and use of mirror as props
  • Lovely close up angles e.g. high angle and ECU of eyes
  • Editing to the beat with blinking works well
  • Great sequence of them taking make up off and letting hair down
  • Like the comparisons towards the end
  • Good use of black and white
  • Like the split screen

He also gave us some ways that he felt that we could improve. These were even more important as it helped us to make specific areas and the video as a whole even better. We valued his feedback and wanted to improve our music video as much as we could.

Improvements:

  • Possibly make the true taking off of make up and hair later- this happens quite towards the start, you could include even more shots of your stars with the make up before they take it off.
  • Switch the clips at the beginning so it starts with a close up of the star.
  • Possibly make some of the shots a bit quicker to add slightly more variety.
  • Switch the sequence of Anya at 2:16 to a mid shot going into a close up.
  • The lens flare near the end is a bit bright and random.
  • Lovely ending but maybe make it longer to drag out the emotion.

Overall I agree with his feedback. I think that by making these changes we can make our narrative and reflection of star image stronger overall. This will make the meaning even more clear for the audience and will impact on the viewer.

September 21

Music Video Draft 2

Here is the second draft of our music video, this is where we began to add in our narrative shots. It worked well, and we were happy with how this draft went, but we still feel that we have much more to achieve and grow with.

Self assessment

  • I felt that our narrative links well with our performance shoot, I think that they work well together and that it is fluent.
  • I think that our narrative idea works well, and that is it clear and easy for the audience to understand and follow.
  • I think that our editing so far e.g. shot length etc all work well and is successful.
  • Our lip sync worked well and was very in time.

Targets for Improvement

  • I think that we can use the skills that we learnt from Lenny to improve our video even more, we can use more techniques to suggest our narrative even more and influence the way that the audience sees it so that it is even more clear.
  • By adding more complex levels to our editing I think that we can elaborate and give our video an even deeper meaning which in turn will give the audience a more meaningful response.
  • I think that we can colour correct some of our shots for even more impact.

Overall thoughts

Overall I am really happy with the video that me and Paige have produced. I think that we still have many areas that we can focus on in the editing to make our video even better. But at the moment I am really happy with how well we have done. we ar eon track with where we need ot be, and have plenty of time to experiment with editing and colour before completing our final draft for our music video.


September 18

Specsavers Feedback

We had some members of the Specsavers creative and digital team come in and give us feedback on what we had done so far with our music videos, and they spent some time teaching us skills that could help us. Lenny, who works with Adobe Premier Pro and is professionally trained in this software gave us feedback on our video and he helped us a lot. He was very positive about what we had done so far and he liked our idea and edit so far.

He taught us many things, here are an example of some of them that have been most useful to us in our editing.

  • ADJUSTMENT LAYERS- we learnt about how to use an adjustment layer to apply edits to colouring etc to a selection of clips not just working one at a time.
  • GRADIENT OPACITY- he also showed us how to use key frames to bring the filter that we had made onto our videos gradually so that there is a subtle change across the whole video developing the star into this perfected image.
  • CURVES- he also showed us how to use curves to edit our colouring to create a Instagram filter effect. We used this by adding more blue into the shadows of our shots.
  • NESTING- he also taught us about nesting and how we can use this to add in multiple adjustment layers to our work.

Overall his feedback and the skills that he taught us were invaluable to us as we continue to develop our video and add more complexity in the editing. Here are some YouTube videos about what Lenny explained to us that we have re watched for reference.

September 14

Shoot 2 Reflection (Narrative)

Overall I felt that our narrative shoot went really well. I was really happy with the way that it went. My team worked well as a group and we got all of the shots that we felt that we needed. We had planned our shoot well and had everything that we needed for our shoot to be successful. I think that the makeup look that we did worked really well to go with our narrative.  I also think that the costuming and hair worked well too.

What could we have improved on?

  • Some of our shots were slightly out of focus- however we filmed plenty of footage so we have a lot to work with.
  • Some of our handheld shots were a bit shaky

What went well?

  • The make up and hair went really well.
  • Our angling- we managed to get some really interesting angles in our footage.
  • We filmed a lot and have plenty of footage to work with.
  • Our lighting was very strong as we used the soft boxes.
September 10

Design Skills 2

We used a variety of techniques in both Premier Pro and Camera techniques to influence our music video and the message that we were trying to suggest. In this post, I will be outlining some of the most important ones for us when editing that  helped us convey our star image and narrative.

ADJUSTMENT LAYERS- we used adjustment layers in our music video, these were very important in our editing especially our colour correction. We split all of our clips onto different tracks. This then allowed  us to add adjustment layers to a group of clips, and edit them all at the same time, for example we could apply a filter to the entire selection of clips rather than doing it one at a time. The adjustment layers impacted star image as it meant that we could have a continuous edit throughout all the clips this brought fluidity in the video and continuity, this suggested the idea of the constant star image and the constant need to present themselves in a particular way.

CURVES- we used curves to colour correct our music video. We added more blue into the shadows and areas of black to suggest the idea of the Instagram Filter. This suggests the idea of perfection. We adjusted the blue by adding a marker in the bottom left hand corner which is the shadows, and then increasing this upwards which therefore increases the blue in the shadows. This was impactful for the audience as it demonstrated the idea that they felt that this was the only way for them to present themselves to other people and their audience. It added continuity to the video and I think it worked well to convey the narrative idea behind the performance of the star.

NESTS- we used nests so that we could add different adjustment layers to isolated clips, otherwise the adjustment layer would apply to all clips below it. By making a neat we could use multiple adjustment layers and segment the clips to that they all worked well together. This was very useful in our colour correction and filter process as it allowed them to be done to multiple clips and not affect others. This allowed us to group clips together and apply filters to them all, this ensured that the filter was the same and ensured continuity through the video, and the editing was balanced and the same on clips. This helped to present the idea of the continued pressures on the star and ordinary people to look a a certain way.

KEY FRAMING- we also used key framing to either increase or decrease the opacity at certain frames. This allow due to gradually introduce or remove the filter and colour correction that we had made depending on the meaning if that section. The key frames made this transition seamless and caused a natural decrease. We used the hold key frames to that at each clip there was a drop in opacity with the start of each new clip. This allowed us to gradually fade the colour correction out through the entire course of the video. We could also bring it back if we needed to.

Overall I learnt a lot of new skills when editing my video. I also felt that these skills helped Paige and I to convey our star image and narrative more successfully in our editing. I think that these skills and tools were important in the editing of our video and worked well to convey our meaning.

September 7

Video Narrative Story/Shot sheets


We planned out our shoot by making these scene story boards. We looked at each scene or stage of our music video, and what we were trying to achieve in this shoot. We established the message in the shoot, and therefore what shots we would need to make this happen. We looked into the impact that not only the shots but the message would have on people. The shots needed to intimate and close, we wanted to demonstrate the person feeling uncomfortable. This close up, awkward, unwanted angle would help to exaggerate this feeling of not wanting to be filmed. They feel uncomfortable, exposed and judged when they have no makeup on, even though they want to be seen like their true self, society and the media teaches them that this is wrong. The filming and shots captured are very personal to the individual, it is their true self, the way that they see themselves every morning when the wake up. It highlights how society/the media ha taught that this is wrong and made it feel wrong. For the audience, in a music video they are used to seeing all of the people highly made up. Therefore this is unusual and different. It isn’t following the conventions of any music video. This highlights how the media and the concept of star image has a big effect on people. We outlines this in the shots that we were going to use such as close ups.

September 7

Narrative Development

Next we began working on our narrative plan and getting ready to film it. We completed the Step Outline document, where we looked at our narrative in more depth and focused on what we were trying to achieve and how we could do that. We planned out our mise en scene as a group, and looked at our message and what our narrative and our music video as a whole is trying to convey to the audience.

July 9

Design Skills 1

I used a variety of different tools and editing methods in Premier Pro to help to impact my editing and final video. Here are some examples of the ones that helped me to convey my star image, Mise En Scene and narrative the most.

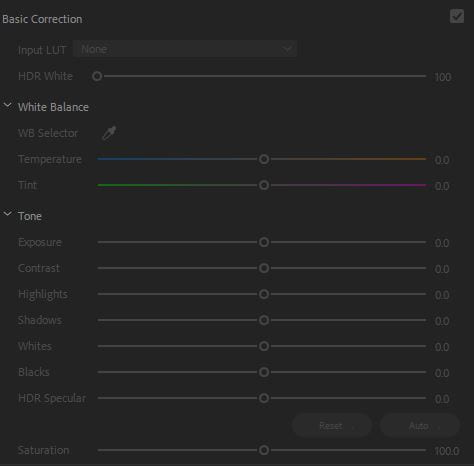
BASIC CORRECTION: The first main tool that influenced the editing to our video, was the basic correction. I used this tool in the editing for many different purposes. I used the exposure, contrast, saturation and blacks mostly. These tools helped me to influence the look of the star image in the clip. For example I increased the exposure in the outside shots, this made it brighter and suggested happiness and freedom. But in the studio shots, I increased the blacks and contrast, not only to suggest that she is on stage and performing, but that she is trapped and unhappier due to this darkness that surrounds her.

VIDEO FILTERS: I used the filters provided for each different shoot and section of the video. I used a different filter for the outside, in studio performance, and paparazzi sections of the shoot. This was to help reflect the different environments that she is in and how this not only effects her but the way that she performs and the way that she acts. At the start I used a brighter more saturated filter, when this is combined with the motion and more fluid editing, it helps to symbolize her freedom of expression and how she is happier and more comfortable.

VIDEO EFFECTS: Premier Pro also has a selection of effects that can be placed on the video. i experimented with different ones. I used both the lighting effect and the lens flare in this edit of my video. I used the Lighting effect on the mirror shoot, this created the idea that she was on stage performing and that the spot light was on her. This highlights the star image and the expectations on her to be framed. I also used the Lens Flare effect to add onto one of the clips, to further emphasis that she is the star and always in the light with camera’s on her.

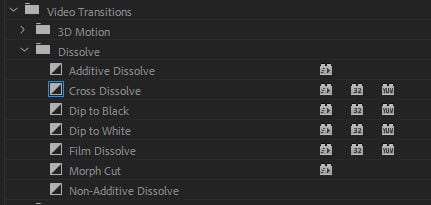
VIDEO TRANSITIONS: I used a variety of transitions to demonstrate the effects of star image, at the beginning of the video I used the Cross Dissolve transition to influence the fluidity, movement and freedom captured in these clips. I used the Dip to White in the paparazzi sections of the shoot to suggest the idea of cameras flashing at her and that the paparazzi are always present. I also used the Dip to Black to suggest the idea of the lights going down and then back up again to suggest how her performances and therefore the impact of the expectations of her on a daily basis. these transitions were useful for me to present the idea of her life and how quickly it goes, but also how little time she has to relax and be herself, this is exaggerated by the fast pace of edit in many sections.

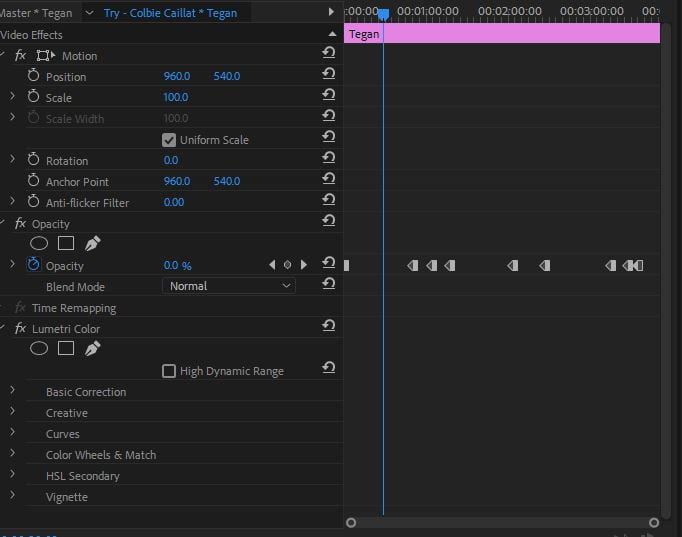
EFFECT  CONTROLS: in the effect controls section, I used the Scale, Position and Rotation tools. This enabled me to edit the scale, so zoom in further on some of the shots if they were important, I could also use the position tool to impact where she was in the frame. This enabled me to edit her positioning, which told a different narrative depending on where I placed her. I also used the rotation tool to be able to rotate the shot onto different angles for what worked best, and too give the idea that she was surrounded by cameras or filming from different angles. I used this tool; mostly to suggest how she is always surrounded by the media and cameras and therefore has to present herself in a certain way.

Overall, I used a variety of different effects and transitions in Premier Pro top help to express the narrative of the star image and how that she is expected to be presented in this certain way. They helped to express my narrative in this shoot and exaggerate the ideas of the star image and also Mise En Scene. I think that I can use these effects further as my editing develops to further impact my narrative.